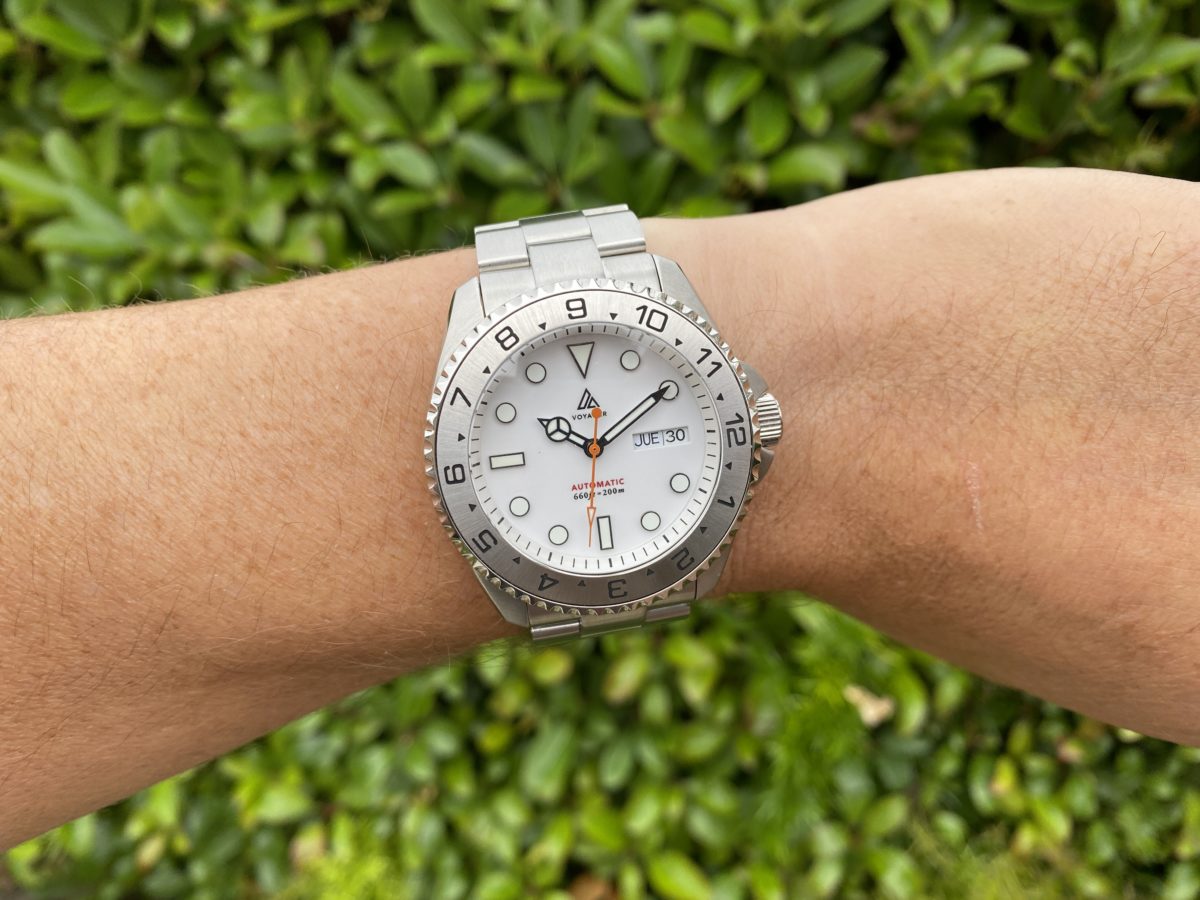
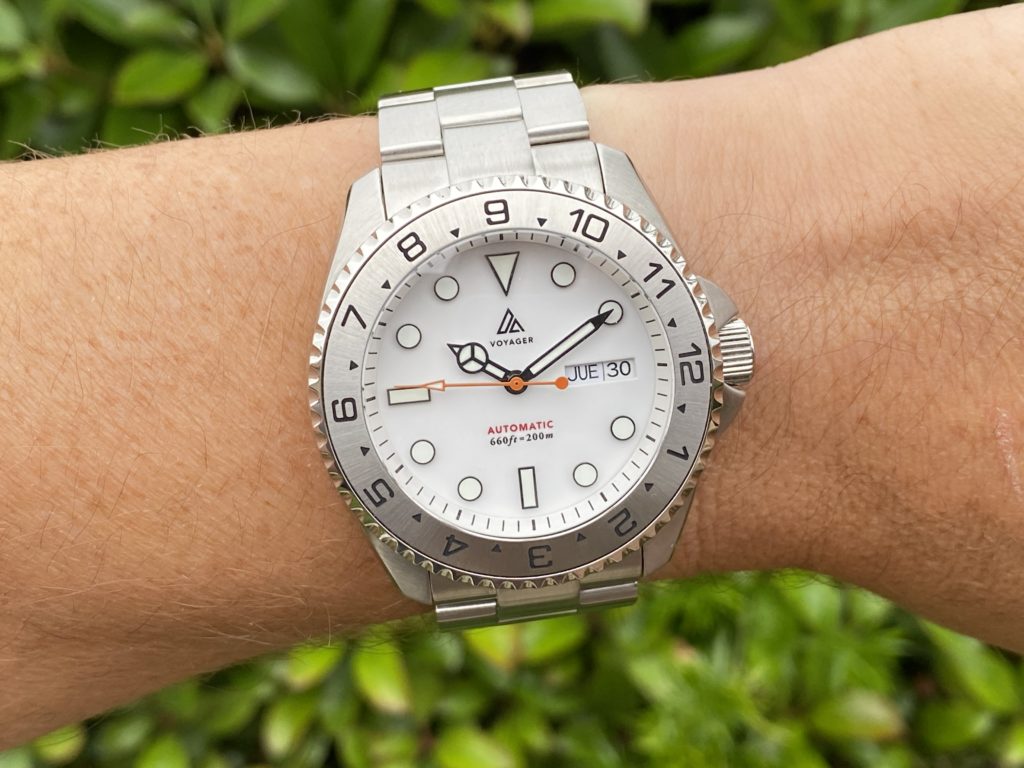
For my second build, I went for the Rolex Explorer II Polar dial style, a watch that has peeked my interest as of late for its clean and distinguished look.
This build is an homage of sort to this beautiful time piece.
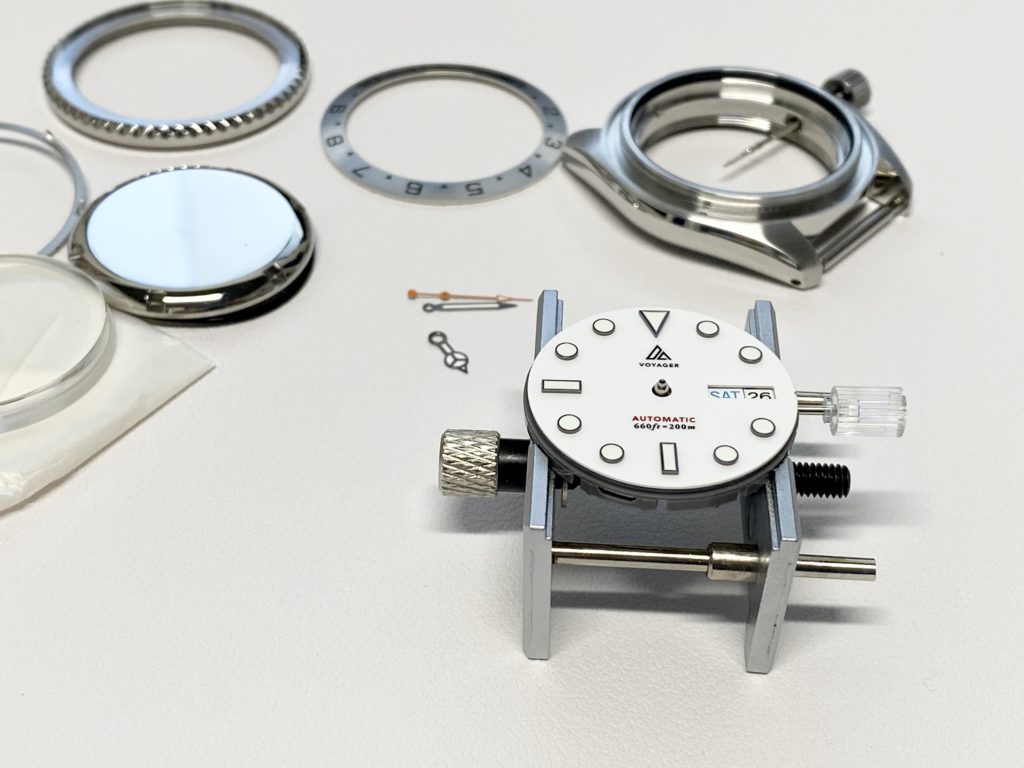
Parts selection
Obviously, the first step of the watch build was to source the right parts which can be easier said than done. More specifically, I think the most critical parts to find were the dial and the bezel insert, which are really what make this build look like an Explorer II.
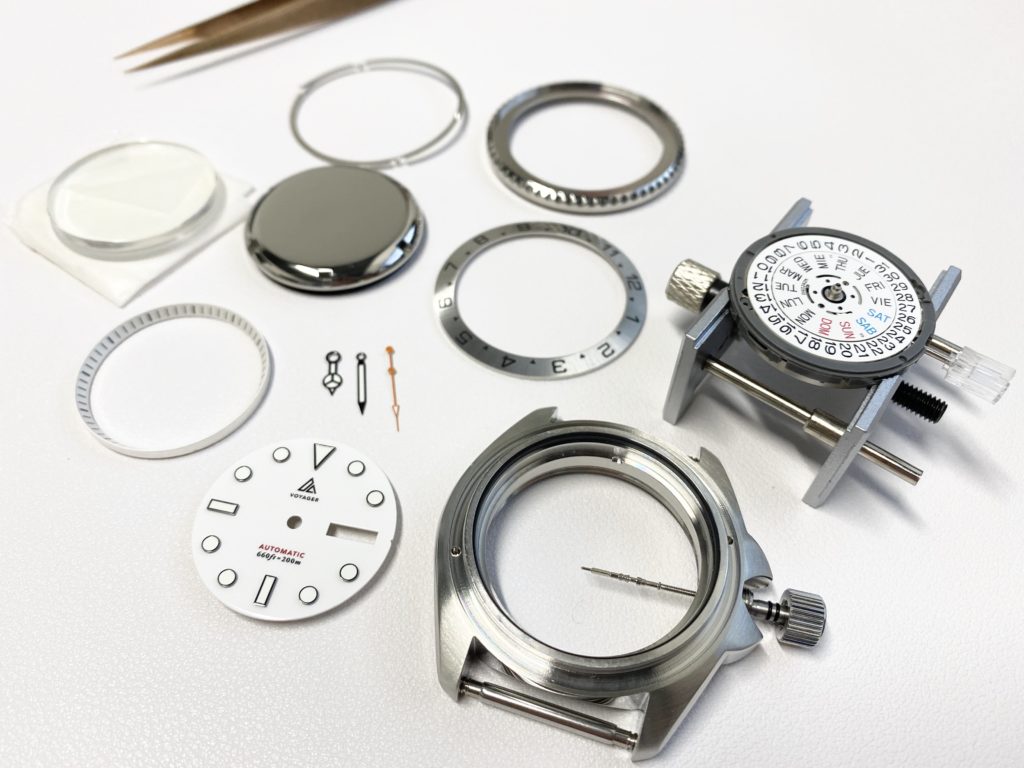
As with my first build, I went for a build based on the popular SKX007 because of the abondance of parts available for it. Below is a list of parts I used along with links to each one of them:
- Case from Crystal Times
- Caseback from Crystal Times
- Crown from Crystal Times
- NH36 Movement from eBay
- Day/date dial from DLW
- Mixed Mercedes hands from DLW
- White chapter ring with black markers from eBay
- Bezel from DLW
- Bezel click spring from Crystal Times
- Bezel gasket from Crystal Times
- 12-hour bezel insert from DLW
- Double dome crystal from DLW
I made sure to order the hands and the dial from the same vendor (DLW) to prevent having a mismatch in the finish and lume. When possible, I really recommend doing so.
Speaking of DLW, a great thing about them is that they offer some flexibility in your choice of hands, allowing you to mix and match certain hand styles. In this case, I was able to choose 2 gun metal Mercedes hands along with an orange seconds hand. Most part vendors do not allow such flexibility.
I hesitated between a red and orange second hand for a while but I eventually settled for orange. I was afraid the orange would contrast too much with the red text of the dial, and at the same time I was afraid a red second hand would bring too much red to the face of the watch. In the end, I think orange is the right decision.
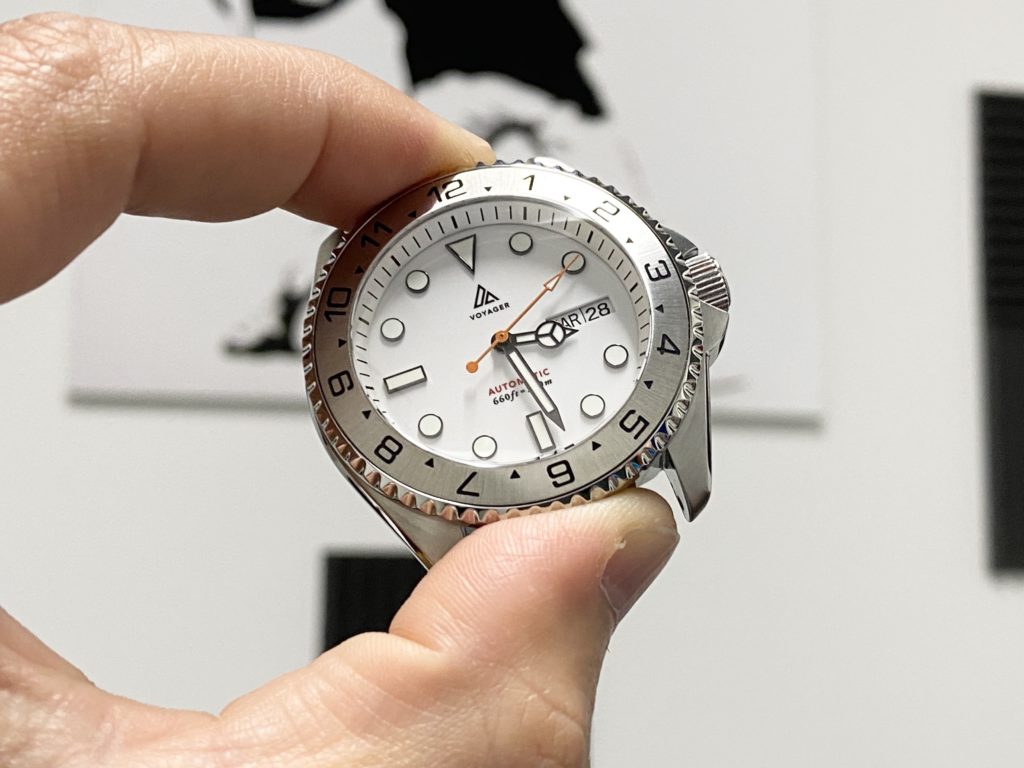
As mentioned above, the dial and the bezel insert are the flagship items of this build, but it’s clear that the bezel itself is very important as well. I spent quite a bit of time looking at photos of the Polar Explorer II online to try and find the best possible match for the bezel. I settled with the one listed above from DLW.
Now you may have noticed that it’s a 12-hour bezel insert instead of a 24-hour one as found on the Explorer. The reason is two-fold. First, I couldn’t find any 24-hour bezel insert, but maybe more importantly, such insert would be useless because the NH36 movement doesn’t have a GMT function.
That said, with this 12-hour insert, I can track the time in two time zones, which can be done by rotating the bezel to the desired time difference. For example, I am tracking time in both my time zone and in France, which is 9 hours ahead of my current time. I rotated the bezel to show 9 at the 12 o’clock position, and I can quickly find out the time in both location at the blink of an eye.
Cost breakdown
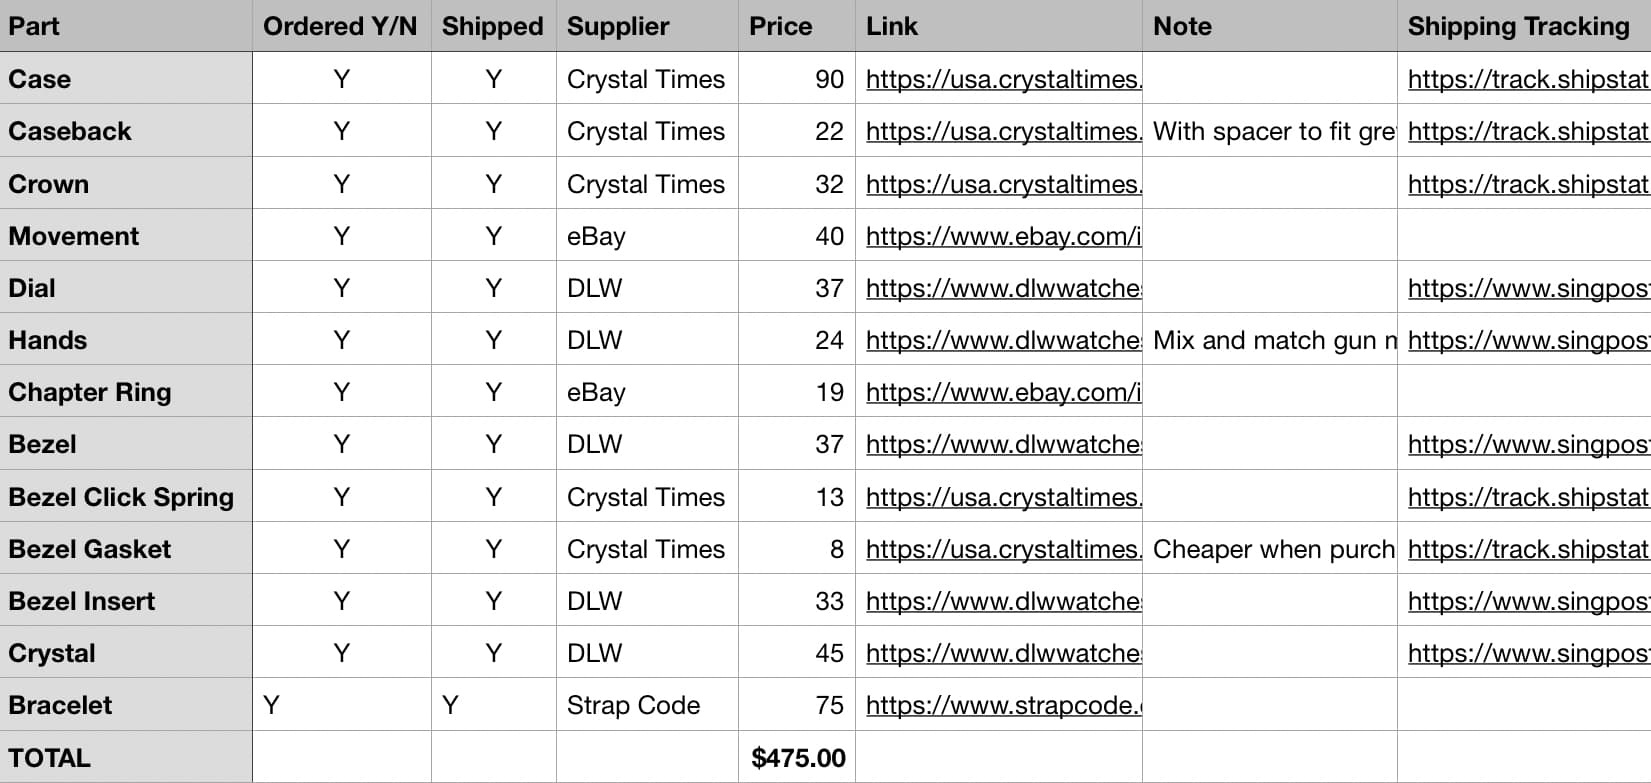
Clocking at $475 (strap and taxes included), this is not a cheap build, and as most would rightfully argue, it would be more cost effective to buy a Seiko from any online merchant.
But of course, money is not what’s important here. All the fun is in building your own watch and handpicking each individual part. That said, yes, it’s pricy…
Building the Rolex Polar Explorer mod
Learning about the movement
This was my first time using the NH36 movement. I did use its sibling in the past, the NH35 movement, but I was unsure about how to use the NH36 properly. So a quick look online and I learned about the different crown positions of the NH36:
- Crown at 0, clockwise: normal winding
- Crown at 1 clockwise: day correction
- Crown at 1, counterclockwise: date correction
- Crown at 2: hacked time setting
Fixing the dial on the movement
There is no difference here between the NH35 and the NH36. All you have to do to mount the dial onto the movement spacer is to clip two of the four legs of the dial. Before doing so, you’ll first have to place the dial on top of the spacer to find out which legs must be cut off. Your dial may already have only two legs, so obviously skip this step if need be.
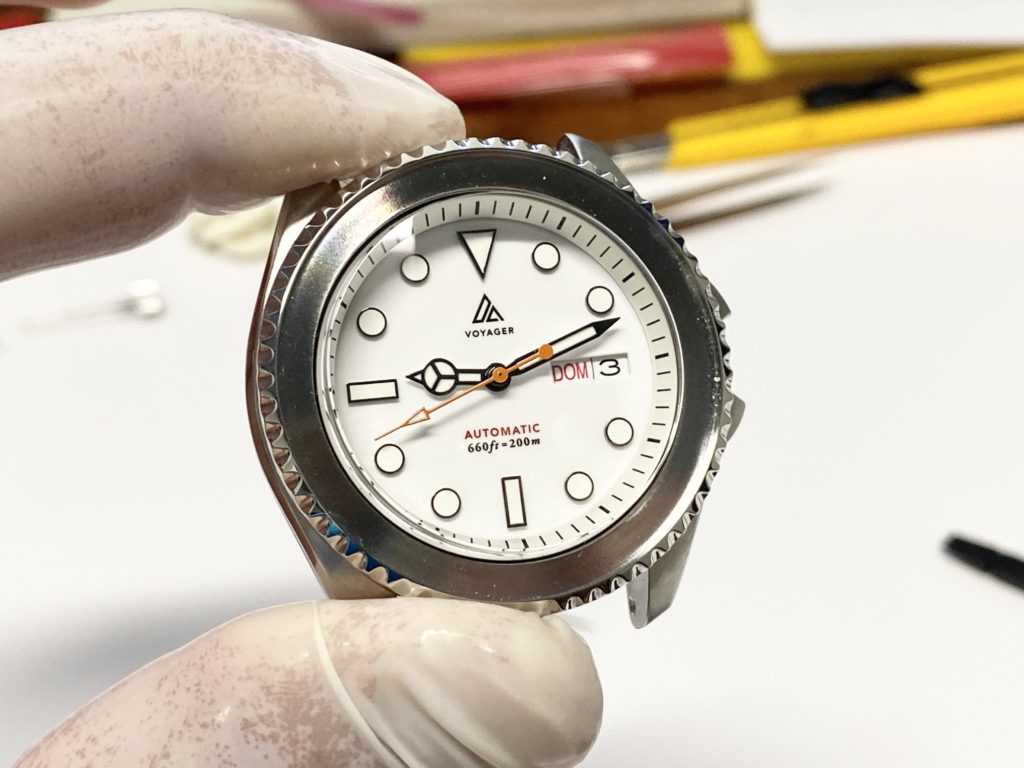
To prevent any mistake, I mark the legs that need to be removed with a marker, as you can see on the photo below. When working on the dial, I always make sure to use finger cots to avoid unnecessary grease on the dial.
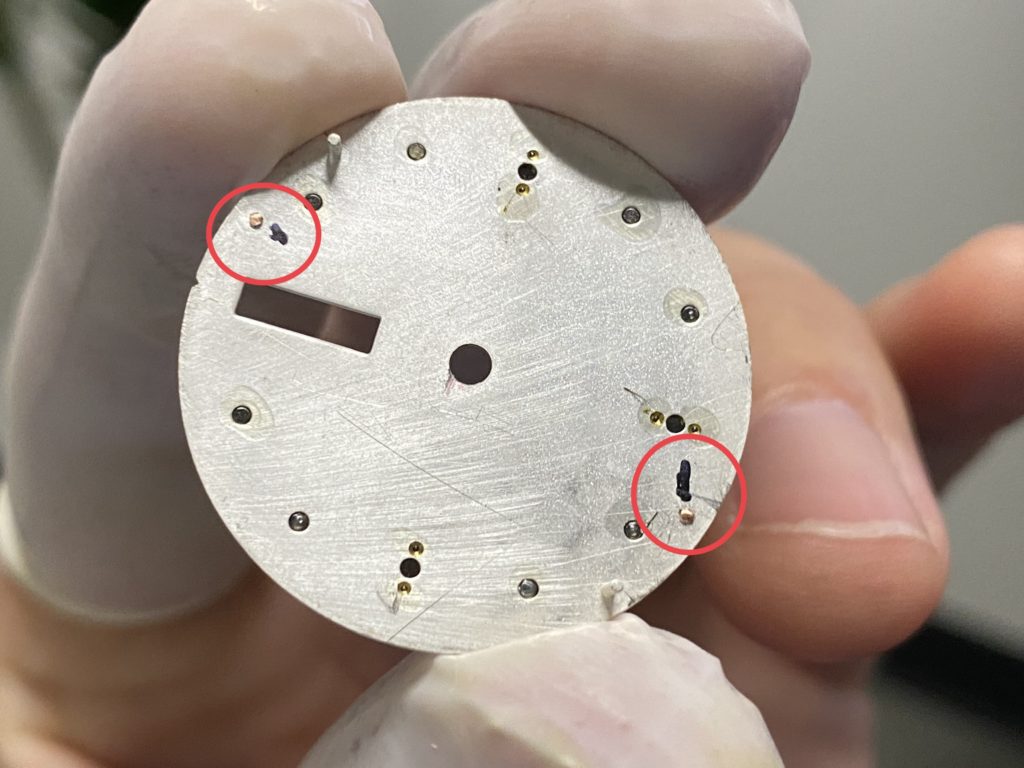
Best practice would probably require the use of cutting pliers but I haven’t found any that feature a flush blade to cut the leg as close to the dial plate as possible. My workaround is to use a cutter as a saw of sort and slowly cut the legs flush. Then I use a fine file to remove any excess from the plate.
Once the dial is ready, you can just set it using gentle pressure on the movement spacer. Once fixed properly, I then use Rodico to clean the dial and remove any possible dusts specs.
Hands setting
Here we are for the most tedious part of a watch build, at least in my opinion. If you’re the kind of person who doesn’t mind to do things approximately, then you should be just fine. But if like me you like things to be perfect, your OCD could have you spend an hour on this task.
First step of hands setting is to put the crown in its hacking position and slowly turn it until you see a date change.
The good thing is that the NH36 does give you some warning about a day change as you start seeing the date move around 11.30. All you have to do at that point is to very very slowly turn the crown until the date changes. At that point, you know you are at midnight and if you did a good job, this is where your hour hand should be.
The hour hand is undoubtedly the easiest one to set. Armed with my bronze tweezers, I put the hand in place, slightly rotated it with my plastic stick, and pressed it using my Horotec hand press. Once in place, I check for clearance between the hand and the dial, making sure the hand is as parallel as can be to the dial. If necessary, you can apply a little bit of pressure with your plastic stick to adjust the angle and make sure it’s parallel.
Then of course, you should put the crown in position 2 and turn it for about 23 hours. At that point, you should slow down and prepare for the next day change.
The process is pretty much the same for the minute hand. Wait for the date change to click, then set the hand, and press it down onto the cannon pinion.
Again, you want to check for clearance between the two hands, and make sure both hands are still parallel to the dial. Still in position 2, use the crown to check hands alignement and clearance in difference positions. Typically, I like to check for 12, 3, 6, and 9 o’clock positions as these can really highlight any misalignment. If that’s the case, remove the hand(s) and start again.
When you’re ready, move to the second hand, arm yourself with patience and go ahead. It doesn’t matter as much at what time you set the second hand. To do so, I usually move the hour and minute hands at 6.30 to get them out of the way, and try to set the second hand at 12.
I learned during my watchmaking course that there are specific tweezers used to set hands (or course there are). Unfortunately I do not own such a tool, and after trying to put the second hand in place with my bronze tweezers, I gave up and eventually used Rodico. This is blasphemy to a watchmaker, so good thing I am not a watchmaker… It took me a while but I got it down thanks to Rodico, and once again using my hands press, I put it in place.

I did a final check for clearance and parallelism. Then a final check for proper time alignment. 12, 3, 6, and 9 all looked good, so we are ready to move forward after doing a quick clean up of the hands using Rodico.
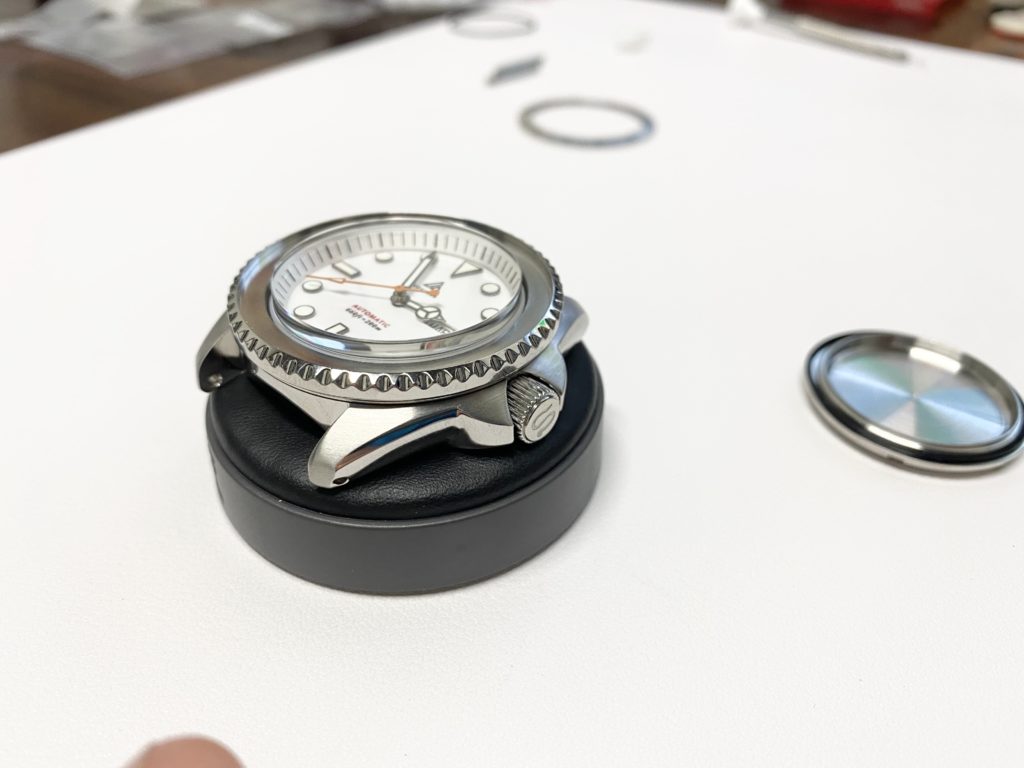
Chapter ring and crystal installation
Before putting the chapter ring in place, I thoroughly cleaned up the inside of the case using Rodico. It was clean, but you can never clean a watch enough, especially during the build process.
I then installed the chapter ring, which was very simple. Just drop it in, and if your ring has a little bump, make sure it fits into the case notch. This is made to prevent the chapter ring from moving around. You may even use 3M tape or instant cement to keep in place but I don’t find that necessary.
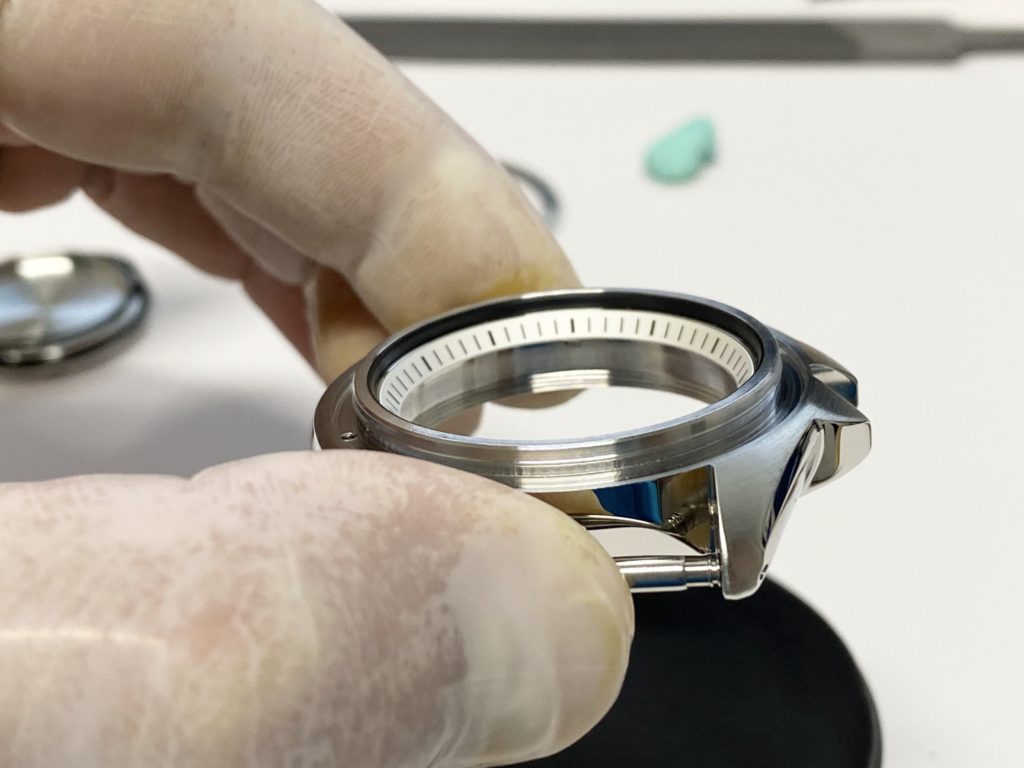
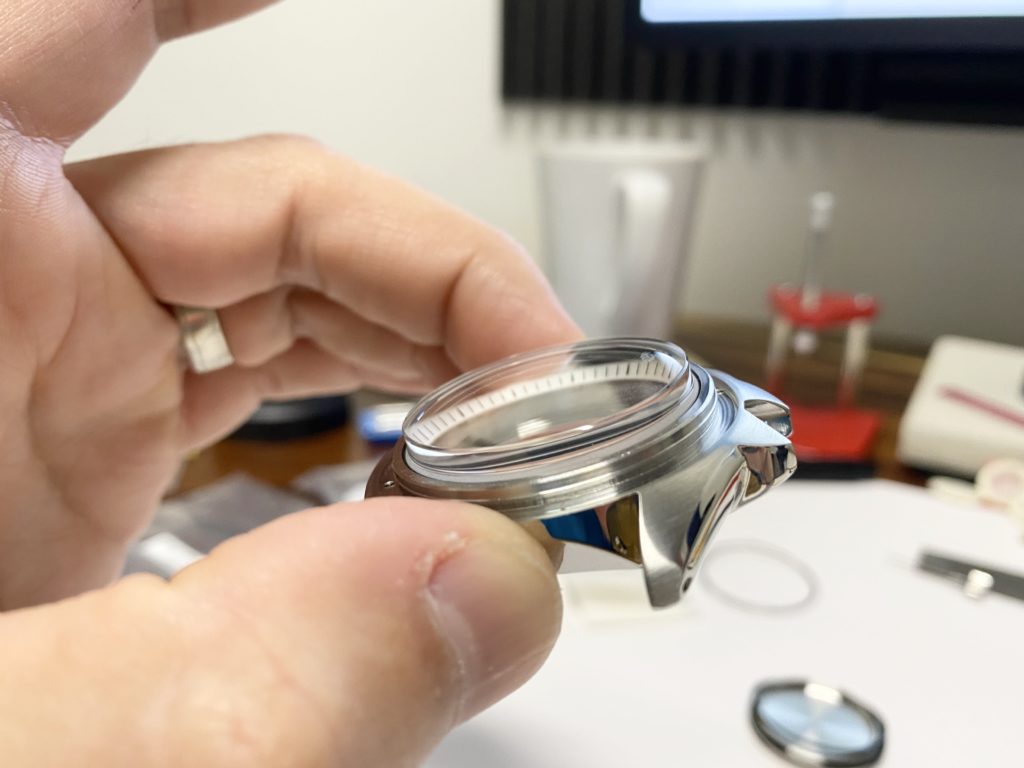
Then make sure the crystal gasket is in place in your case, clean up the crystal thoroughly, and it’s time to press it in.
For my first build, I had a cheap crystal press which I found was quite crappy, so I had purchased a better crystal press.
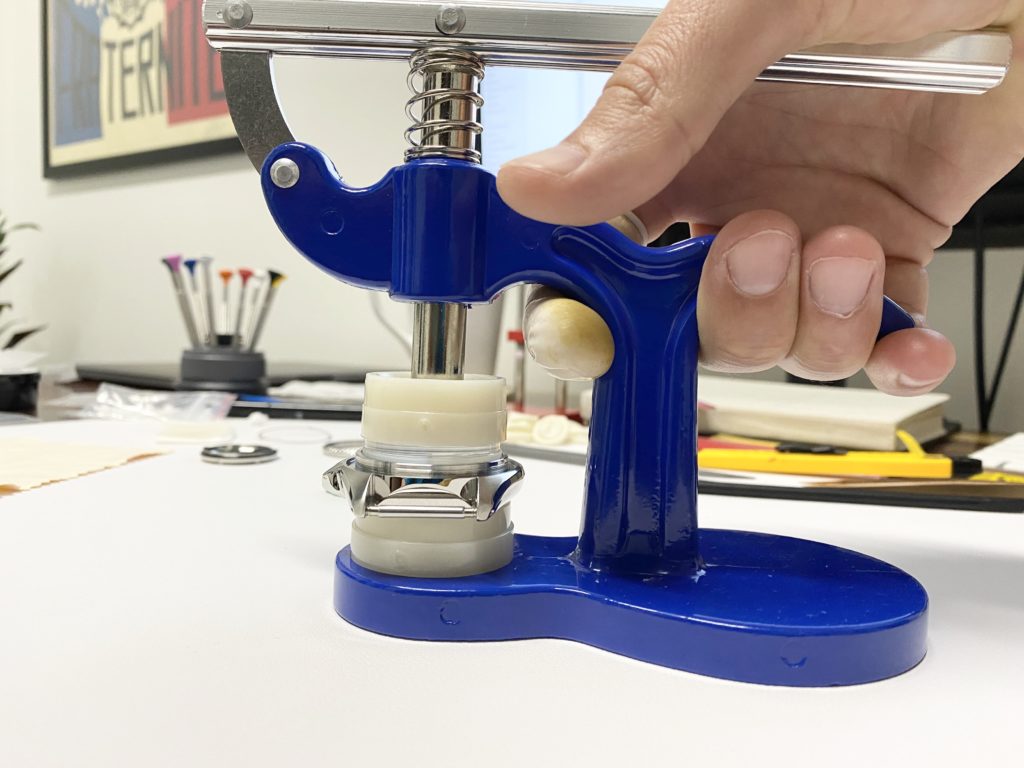
Turns out this one wasn’t much better than the previous one and I struggled to put the crystal in place to my liking. Again, maybe most people wouldn’t care and would call it a day quickly, but I wanted the crystal to be set in perfectly. It took me about an hour to do this right. Even then, I’m just 98% satisfied with my work. That said, the quality of my work can only be as good as the quality of my tool in this case. I just couldn’t do better. Chances are, you won’t even be able to tell, but I know I will.
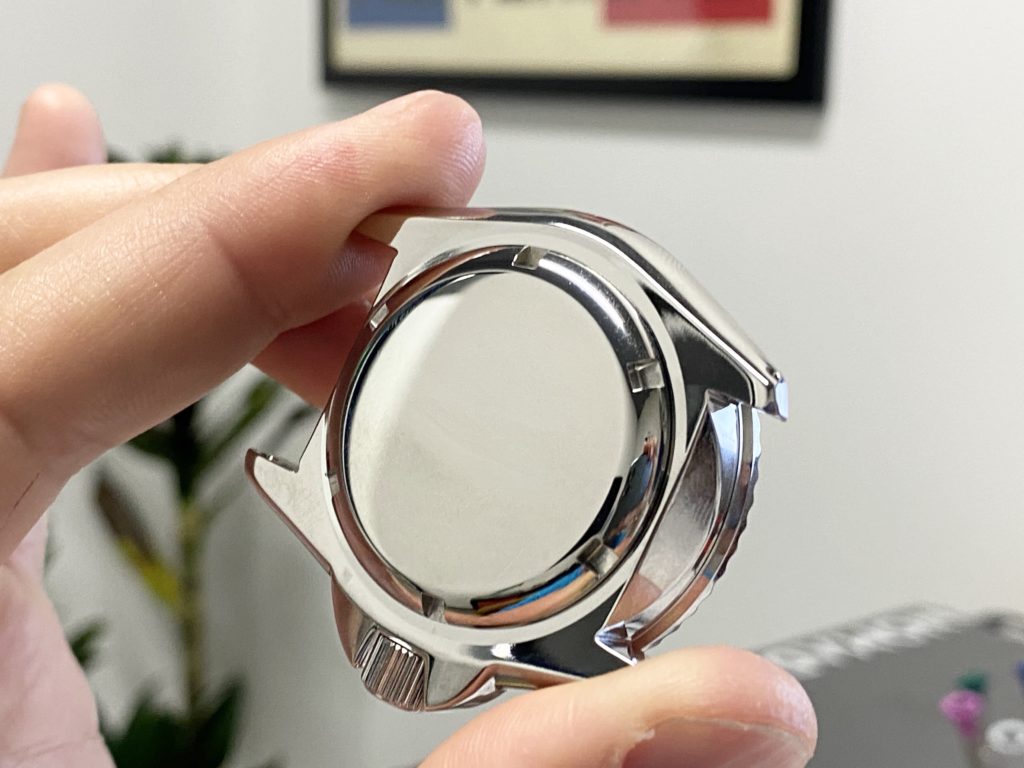
Click spring and bezel
No big problem here. Simply place the click spring onto the case, making sure the two legs fit in the two holes of the case.
Then apply some silicone grease on the bezel gasket, and put the gasket back in place inside the bezel. This can be a bit tricky but patience once again goes a long way.
Finally, press firmly on the bezel to click it in place. If it is your first time installing a bezel, don’t be afraid to press hard. You may use a crystal press for that, but you can also do it with your hands, which is what I did.
Then of course, turn the bezel a few times to make sure it clicks and rotates well. I must say that this bezel from DLW has a much more satisfying click to it than the crystal of Crystal Times that I had ordered for my previous build. I shall stick to DLW for bezels in the future.
Note that I don’t install the bezel insert until the build is completely done. This is because I want to have the movement in place to perfectly line up the insert with the dial.
Fit movement in the case
Of course, first step is to clean the crystal and the dial as well as you can because this is pretty much your last chance to do so. I suggest using Rodico to remove any fingerprints or dust specs that might have accumulated inside the case or on your dial.
Then fit the movement into the case by gently pressing the case on top of it. Make sure it is aligned perfectly. If not, you can slightly rotate the movement from the back of the case using a plastic stick, or even a small screwdriver. Be careful to not slip though, or else you will leave unrepairable marks and maybe even damage the movement altogether.
Once aligned properly, use a plastic stick to press the movement at 12, 3, 6, and 9 o’clock. Flip the case over and make sure the movement is not only aligned perfectly, but that there is no space between the dial and the chapter ring.
Fitting the stem and crown
Using cutting pliers (or a cutter in my case), trim the stem to the correct length. Unless you have a caliper, it will take a bit of trial and error here until you reach the right length.
Between each cut, I screw the crown onto the stem and insert it into the movement through the case. If it’s too long, remove the stem, unscrew the crown, trim some more, and repeat until you get the correct length.
When you do, file the rough end (the one you cut) of the stem thread a bit, apply some blue Loctite 242, and screw the crown in. The Loctite takes about 10 minutes to dry and 24 hours to cure. I suggest not playing with the crown for 24 hours after applying the Loctite, just to be safe.
Finally, add some silicone grease to the stem gaskets and insert it in.
Time to close it in
The project is almost done…
Clean the back of the case and the movement using Rodico. Grease the gasket using silicone grease, place it on the back of the case, and screw the case back in.
Installing the bezel insert
Some bezel inserts come with 3M tape already applied, and some come with double sided tape that you’ll have to install yourself on bezel. That was the case this time around.
So remove one side of the tape, set the tape on the bezel, remove the other side and apply the bezel on top of it.
Obviously, you want to me as precise as can be so you don’t end up with a bezel marker improperly lined up with the chapter ring or dial markers.
Lesson learned from this build
This isn’t necessarily a mistake, but rather a lesson that I hope I will learn… Before settling down for the parts listed above, I had decided on a different case and crown, which I had ordered and received.
This change of heart ended up costing me over $100. I will be able to reuse this case and crown in a future build, but still, this is money that I spent unnecessarily at this time.
For my future build, I’ll try to make sure not to get carried away by the excitement and give myself some time between the time I decide what to build, and ordering the parts. This way, I won’t rush into purchasing something I might not use in the end.
How I could improve this build
Something I should have done prior to building the watch was changing the day wheel language. It’s currently showing the day in English and Spanish. It is not a huge deal in itself, especially because I know my days in Spanish, but I’d rather have the day wheel in French/English or maybe even better, English/English. These date wheels sell for about $10, so that wouldn’t be a big expense.
The other improvement I could make is to make some adjustments to the movement to regulate its timing. The NH36 uses the Etachron regulating system, which I conveniently learned to adjust doing a watchmaking course. I haven’t put it on my timing machine yet, but it seems to be running at -3s/day so far. It’s totally acceptable, but this is also not a scientific test at all since I didn’t put it on the timing machine. This is a project for another day though.
I will build you a watch for free
If you’re interested in having me build a watch for you, I will do it for free as long as you supply all the parts and cover all shipping costs. Feel free to hit me up either by email or on Twitter.