For some time now I’ve been looking into how to build a watch, both on Google and YouTube. I was specifically looking for a tutorial that would walk me through the entire process, from parts selection to the actual build. After several hours of research, I didn’t find anything satisfying.
Then I stumbled upon watch modding, which as the name suggests, is about taking an existing watch, and changing a few things here and there to make it your own. It turned out that Seiko watches are the most popular watches to mod because there are just tons of parts for them out there.
I didn’t want to mod a watch but rather build one…
So I decided to source all the parts to effectively create a watch from scratch. Obviously, I didn’t build the movement, but everything else was sourced from various websites so I could assemble it all.
What type of watch do I want to build?
I’m not the creative type and I definitely needed inspiration when it came to figuring out what kind of watch I wanted to build.
It was fairly easy to settle on a design because I’ve recently been obsessed with the Tudor Heritage Black Bay 79220N, so I used this as my inspiration.
While I set out to recreate a replica of sort of that watch, it became clear pretty quickly that it wouldn’t be as easy as I imagined, simply because I couldn’t source the proper dial. So I slightly went off track while still retaining the inspiration from the Black Bay.
Parts selection
I decided to go with parts for Seiko SKX007, which seems to be the most modded watch out there, which again means there are many options available as far as parts go.
Here is a run down of the parts I ordered:
- Case from Crystal Times
- Caseback from Crystal Times
- Crown from Crystal Times
- NH35 movement from Crystal Times
- Dial from Lucius Atelier
- Snowflake hands from Watch & Style
- Chapter ring from Long Island Watch
- Coin edge bezel and bezel click spring from Crystal Times
- Ceramic bezel insert from Namoki Mods
- Double domed sapphire crystal from Namoki Mods
Although I had my eyes on a few watch straps, I pulled the trigger and bought a sailcloth strap from Brady Strap.
Estimated cost of this first build
From the get go, I kept everything in a spreadsheet to help me keep track of the parts, the cost, shipping, etc…
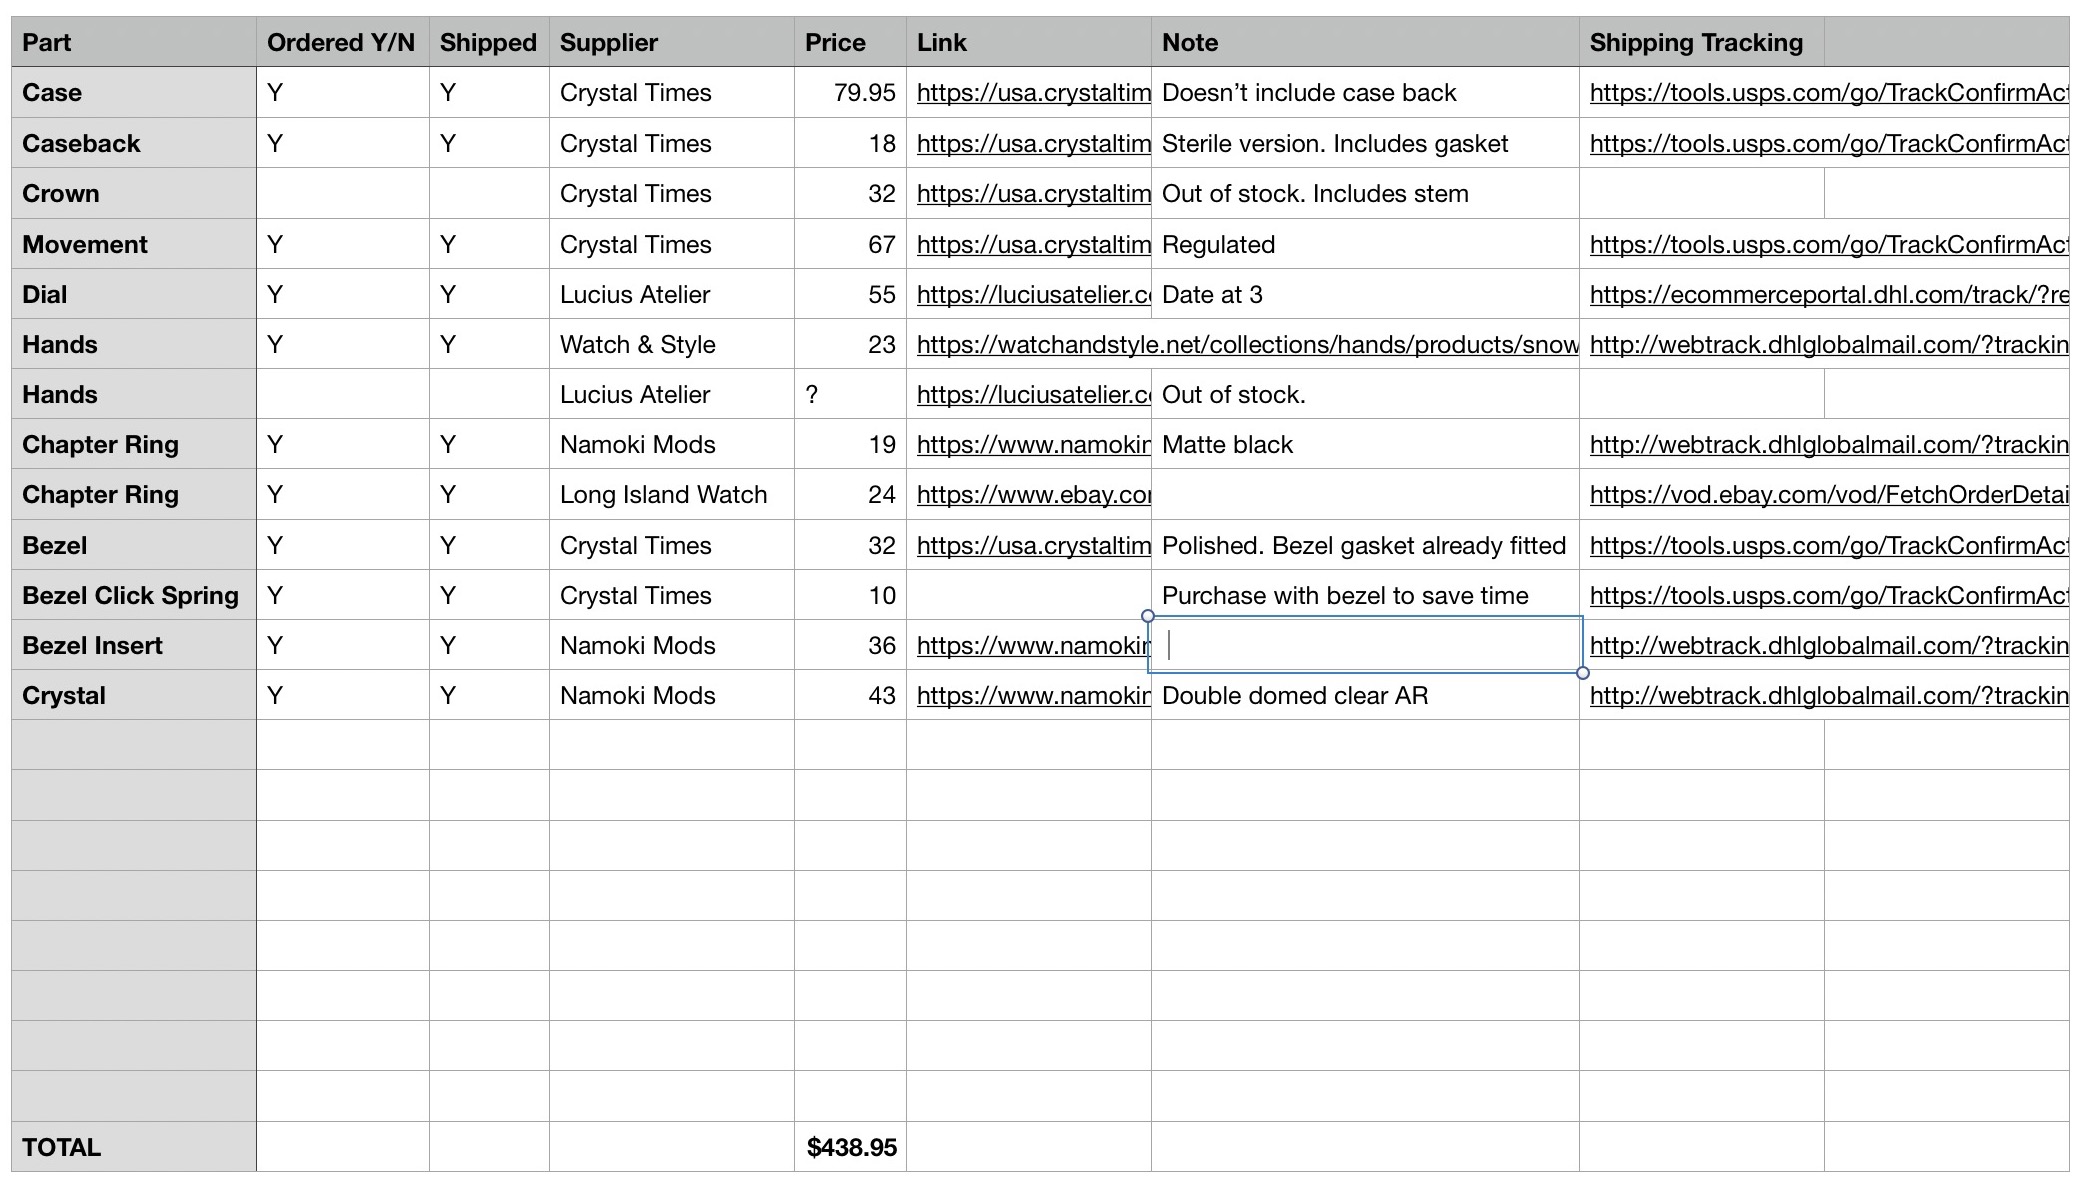
Total cost is approximately $439. I know! It’s a lot of money when I could have bought a cheap Seiko brand new for $200 and start from there.
It’s actually a little more than that since I ended up buying two straps and a different set of hands. So we are now over the $500 mark for this build.
To me, it wasn’t necessarily about the money, but rather about the process of starting from scratch (well, sans the movement), and building my very own watch.
On top of the cost of parts, you have to add watch making tools that I had to purchase, which adds another $200 or so to the cost of the project. The silver lining is that if I really stick to watch building, the cost of tools will be amortized over time.
Putting the pieces together
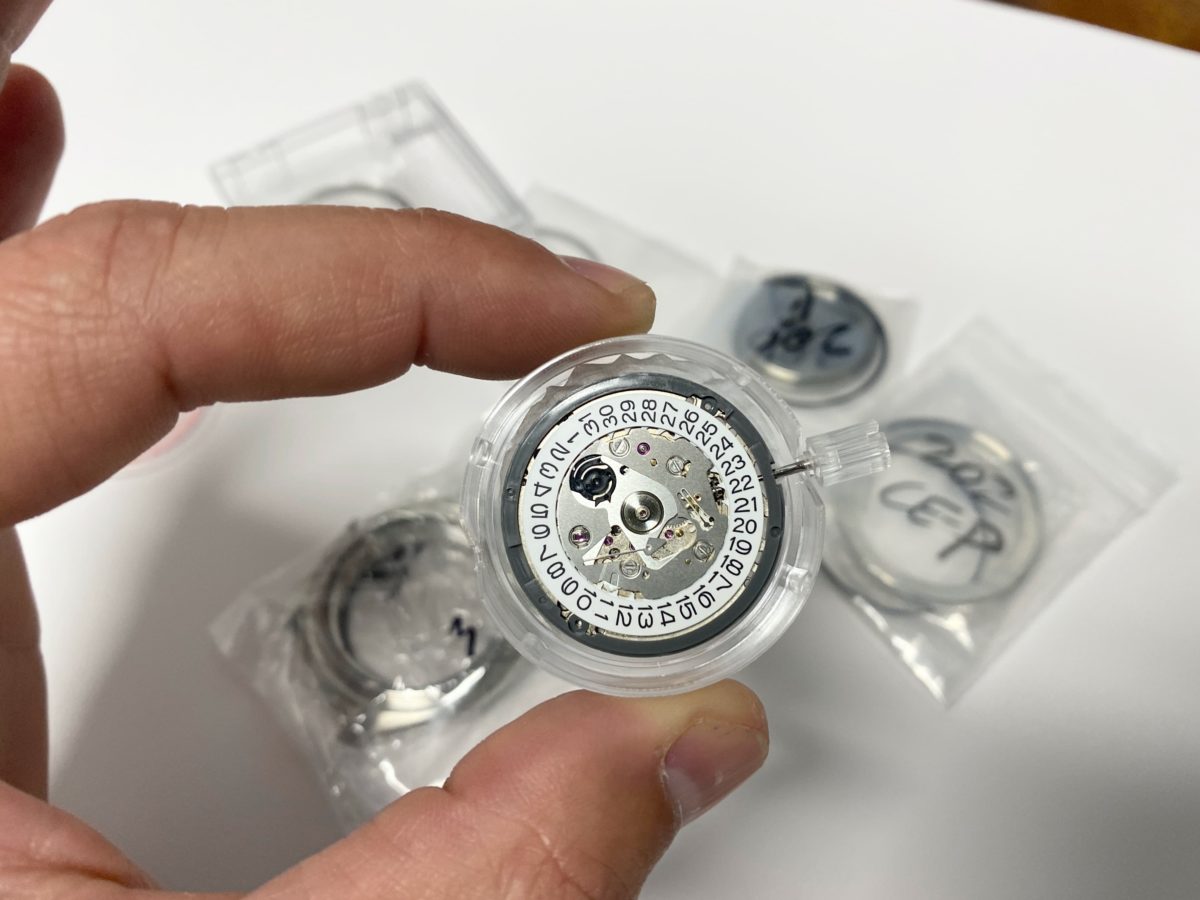
Preparing the movement
First step of the watch build was to mount the dial onto the movement. My dial doesn’t include a date window (it was a personal choice), but the NH35 movement does come with a date wheel. While I would never see the date using this dial, I still wanted the date to change at midnight, so before mounting the dial, I made sure that I changed the time to midnight and waited for the date change. Of course, because there is no dial or even no hands already installed, it’s a bit of a tedious process where you basically turn the crown slowly until you see the date wheel engage. On it is engaged, indicating an imminent change of date, you have to turn the crown even more slowly and stopping right on time at midnight. Perfecting this process is I believe extremely difficult, but I managed to get an acceptable time change.
Mounting the dial onto the movement
The dial I ordered can be mounted with a crown at 3 or 4 o’clock. There are 4 pins under the dial, 2 of which will have to be cut off. Depending on your configuration (3 or 4 o’clock), you remove a different set of pins to fit your movement ring. So after carefully laying the dial on top of the movement, I made a note of the pins that had to be removed and cut them off, or rather sawed them off using a cutter.
Once done, you can mount the dial onto the movement by inserting the pins into the movement ring holes. Of course, because the pins are very thin and fragile, it must be done very gently in order not to bend a pin, or worse, break one.

Applying gentle pressure onto the dial is sufficient to mount if properly in place.
Setting the hands
Properly installing the hands onto the central pin of the movement is definitely the most challenging part of the build because you have to use utmost precision and carefulness. The hands are so small and fragile that they can easily be bent or scratched, depending what tools you use to set them.
I believe there are some special tweezers that can be used to set hands, but I do not own such tool. Instead I opted to use Bergeon Rodico putty, a watchmaker’s best friend.
With the Rodico, I gently pressed on the hour hand to have it adhere to the putty. I then carefully placed it at exactly 12 o’clock onto the central pin. Using my watch hand tool press, I gently pressed onto the center and successfully set the hour hand. To verify the quality of the work, I used a loupe to carefully inspect the setting. It seemed perfect, so I proceeded with turning the crown until the next day change, which if everything was fine, would happen when hitting 12 o’clock again. It worked perfectly.
Next step is the minutes hand, which has a slightly smaller hole, making it slightly more difficult to set. So the hour hand wouldn’t get in the way, I rotated it using the crown to exactly 6 o’clock, and I then used the same method as prior to instal the minutes hand. Once again, I verified it was properly set using my loupe. I then turned the crown and made sure everything worked fine.
It seems to be a common mistake to not properly set one of the two hands, which can cause them to actually rub onto each other. I didn’t have this problem. I then rotated the crown until the next day change, which once again should happen at exactly 12.00. Well, it wasn’t perfectly at 12.00 but it was close enough, especially for a first build.
Finally, I installed the seconds hand. This one gave me a bit of trouble because it is so tiny, and so much smaller than the hour or minutes hands. Again using the Rodico, I tried to set it on the axle, but every time I would try to press on it with the hand tool press, it would just slide off the axle. Eventually, I simply set it by pressing gently on top of it with one of my fingers. It worked perfectly, as I was able to confirm with a mandatory loupe check.
I made a final round using the crown and set the watch to the current time.

This was by far the most difficult part of the build, but it felt incredibly rewarding once I had the dial and the hands situated. Everything really started to take shape, especially when I inserted the movement and dial into the watch case.
Installing the chapter ring and crystal onto the watch case
Next step is to install the chapter ring into the case. The case does include a little notch to facilitate the installation of marked chapter rings, but because the I one I used was a very basic one with no markings, there was no wrong way for me to install it. I just laid it there in place and cleaned it like a maniac with Rodico. That process is very important because it is your last chance to easily clean the chapter ring from any fingerprint or dust. Once cleaned to perfection, the next step was installing the crystal.
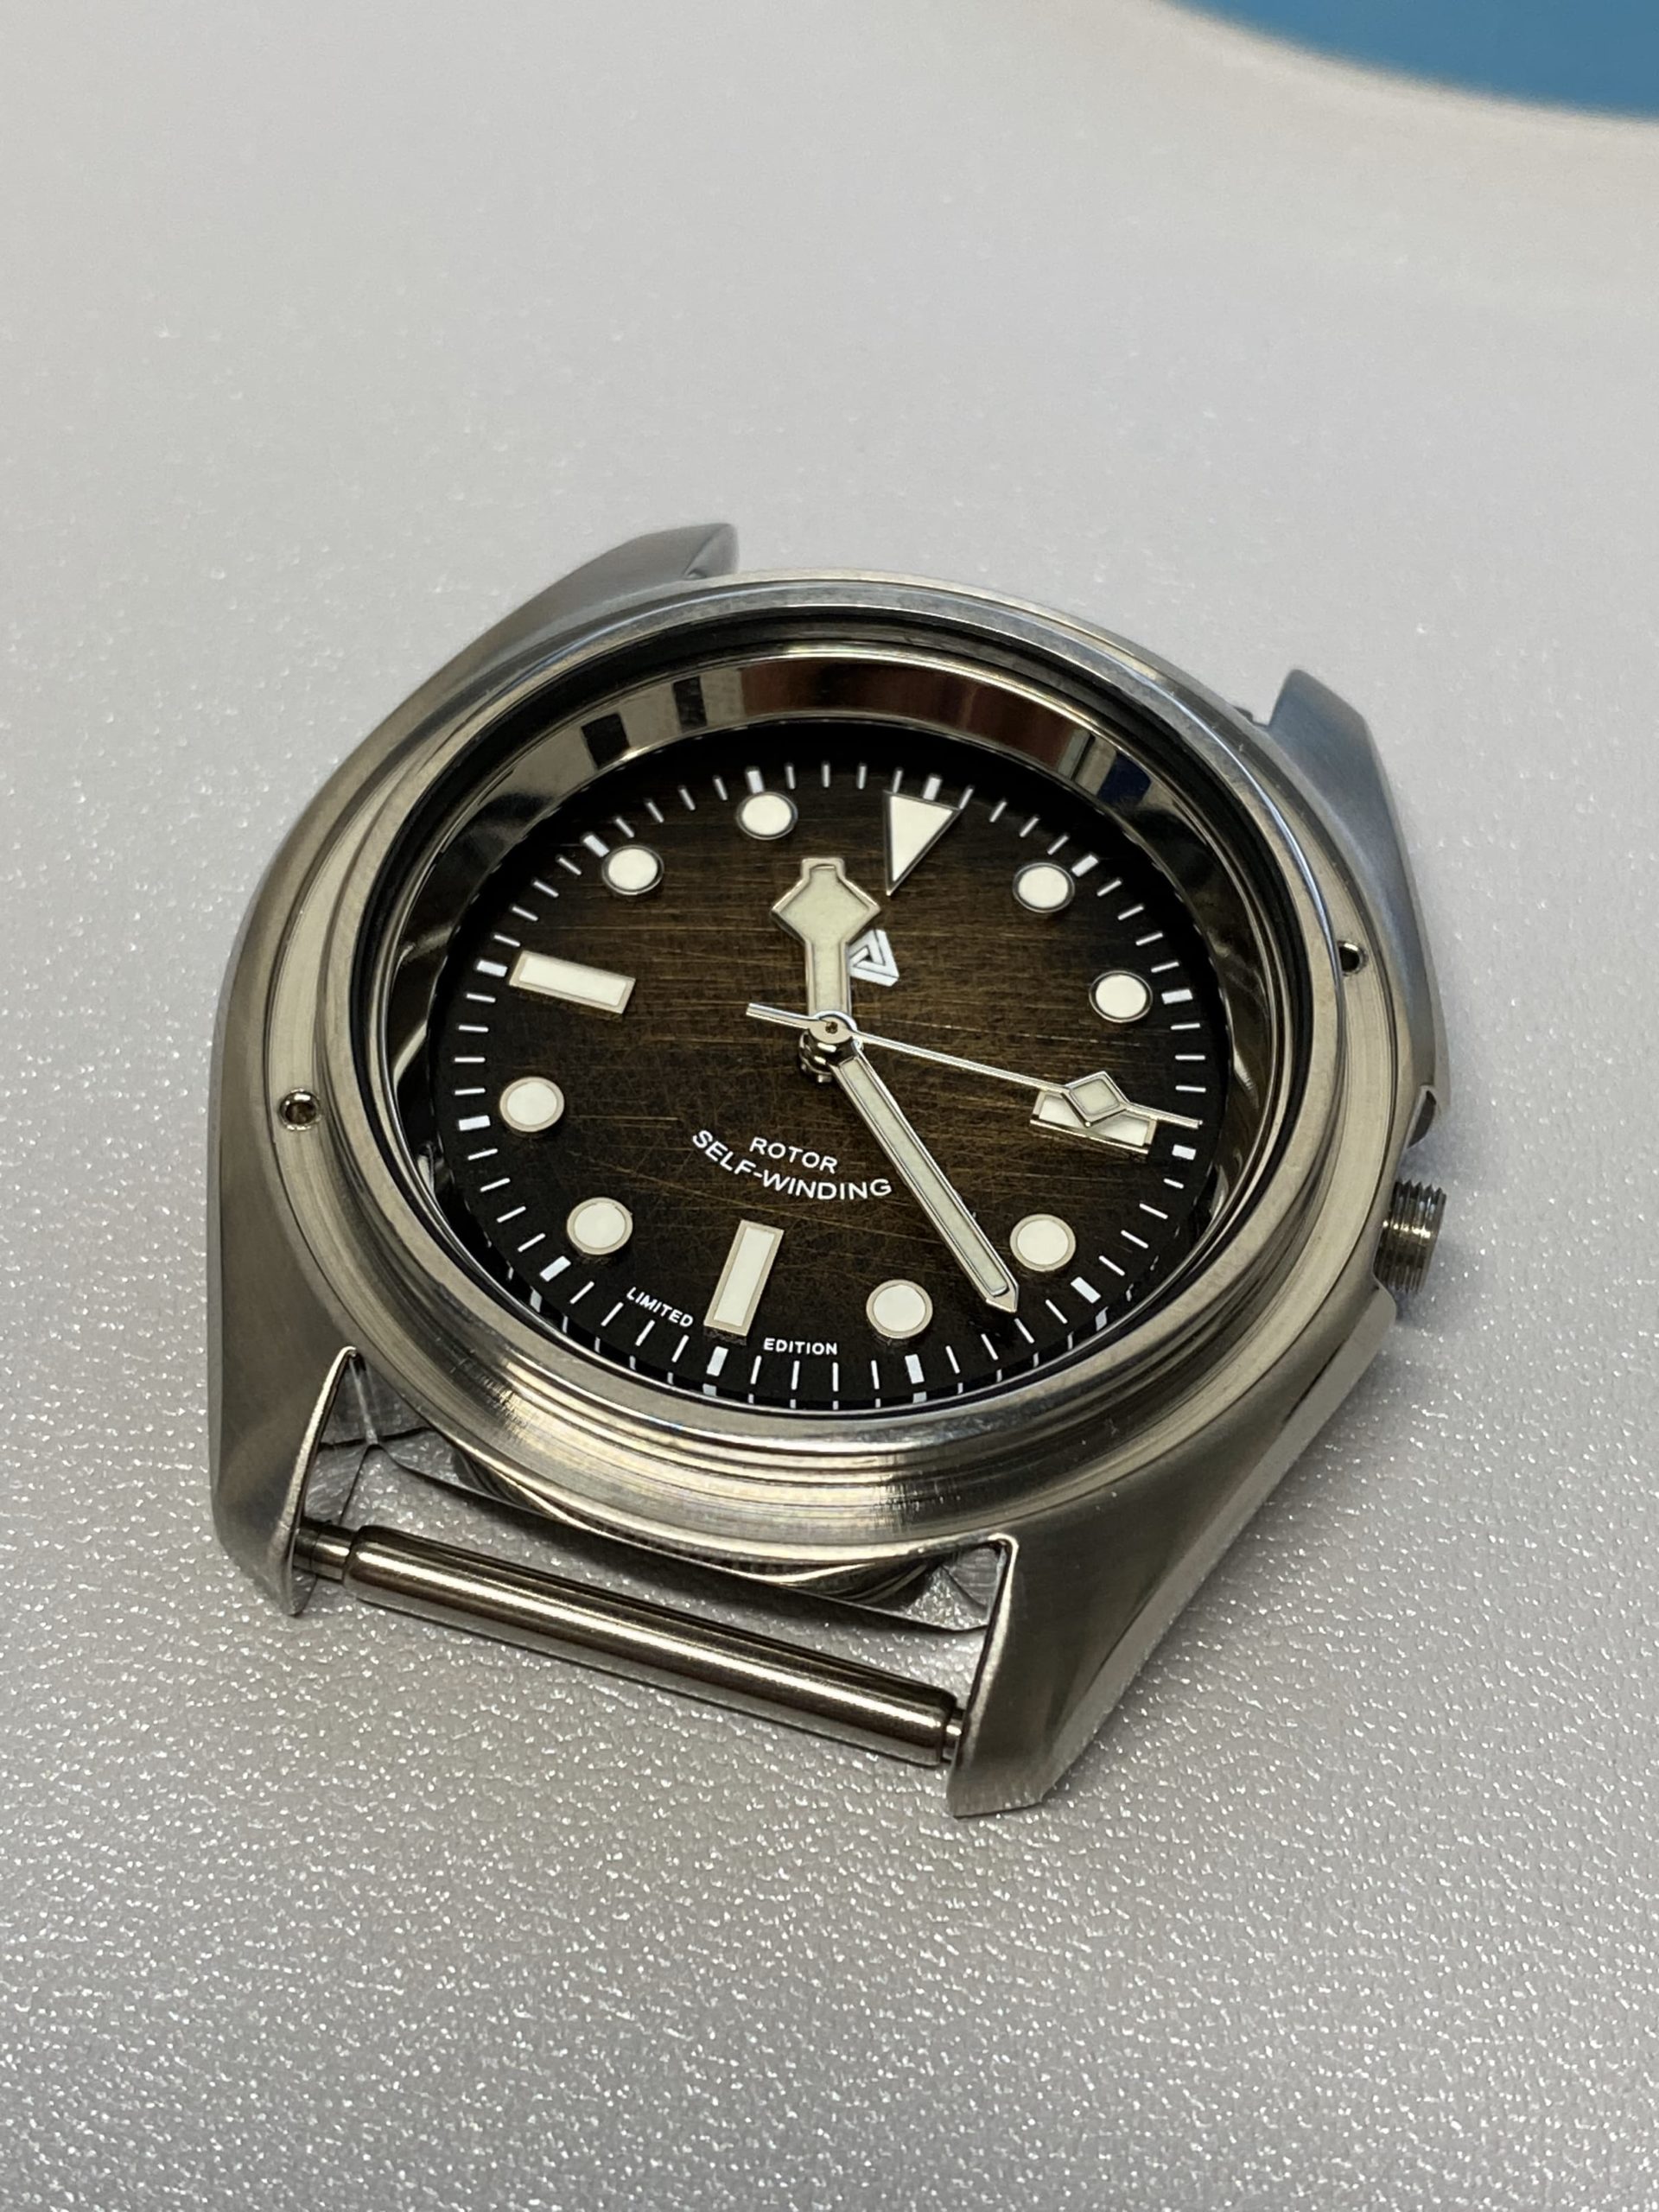
The crystal is one of the most expensive parts of a watch build, and one that can easily break if not properly pressed in.
Once again, I took the time to thoroughly clean the bottom part of the crystal, because again, it would become much more difficult to do so once it’s set.
The crystal gasket came pre-set on the case, so I didn’t have anything to do here. You don’t even need to grease it.
After selecting and installing the correct dies on my crystal press, I set the case in place with the crystal on top, and started pressing to set the crystal. Because I bought a cheap crystal press, the precision wasn’t ideal but after a few minutes of rotating the case and applying more pressure, I finally attained a satisfying result. The crystal was installed properly and evenly.
To reward myself with what I had accomplished so far, I once again put the movement into the watch case. Things looked really close to being done at this point.
The poor man’s waterproofing test
I don’t have the equipment to perform waterproofing tests, but I did want to make sure that the crystal and case back gasket were installed properly by performing a poor man’s waterproofing test.
To do that, I first removed the movement from the case, then screwed the crown all the way in, greased the case back gasket with some silicone grease, and closed the case back.
I then dunked the watch into a glass of cold water. It stayed in there for a few minutes, after which I took the watch out of the water and put it directly in the sun behind a window. I figured that if a tiny amount of water had made its way in, I would probably see some condensation form behind the crystal.
I’m fully aware this is not a great way to test the waterproofing of a watch, but this is as good as I could do given what I had.
The test turned out successful.
With the build now having been completed for several weeks, I can say that I have taken the watch in the shower on multiple occasions, and it doesn’t show any sign of water damage. I wouldn’t go surf or dive with it, but I certainly feel comfortable taking a shower with it.
Click spring, bezel, and bezel insert installation
With the hard part of the build behind me, I continued to the next step by putting the click spring in place and pressing the bezel on top of it.
There isn’t much room for error when setting the click spring because it has 2 pins that go into 2 small holes on the case. You can’t go wrong there. I then pressed the bezel on top of it until I heard that loud satisfying click sound.
Of course, I immediately started rotating the bezel, hoping to hear the clicks but I could tell something was off. The clicks didn’t click right, and worse, the bezel was sometimes harder to rotate, as if something was in the way. This is where I made my beginner mistake number 1.
Using a bezel removal tool, I popped the bezel out and tried to adjust the click spring by pressing on it with a tooth pick. This turned out to make things worse. I have since learned my lesson: you should never try to adjust the click spring.
I also noticed that the gasket inside the bezel was slightly coming out. I tried to put it back in place but it appeared to be too big for the bezel itself. I figured out that this was probably what was causing the bezel to be hard to rotate at times. I don’t know if the gasket wasn’t right from the start but fortunately, I had another gasket handy. I lubricated it with silicone grease, set it properly, and pressed the bezel again.
The clicks were even worth than before I “adjusted†them, but the bezel was at least rotating fine. I ordered another click spring  (an OEM) which I installed correctly, but the clicks still aren’t that satisfying to me. I’m wondering if it has something to do with the bezel itself. I will live with it but I’d lie if I said it doesn’t bother me.
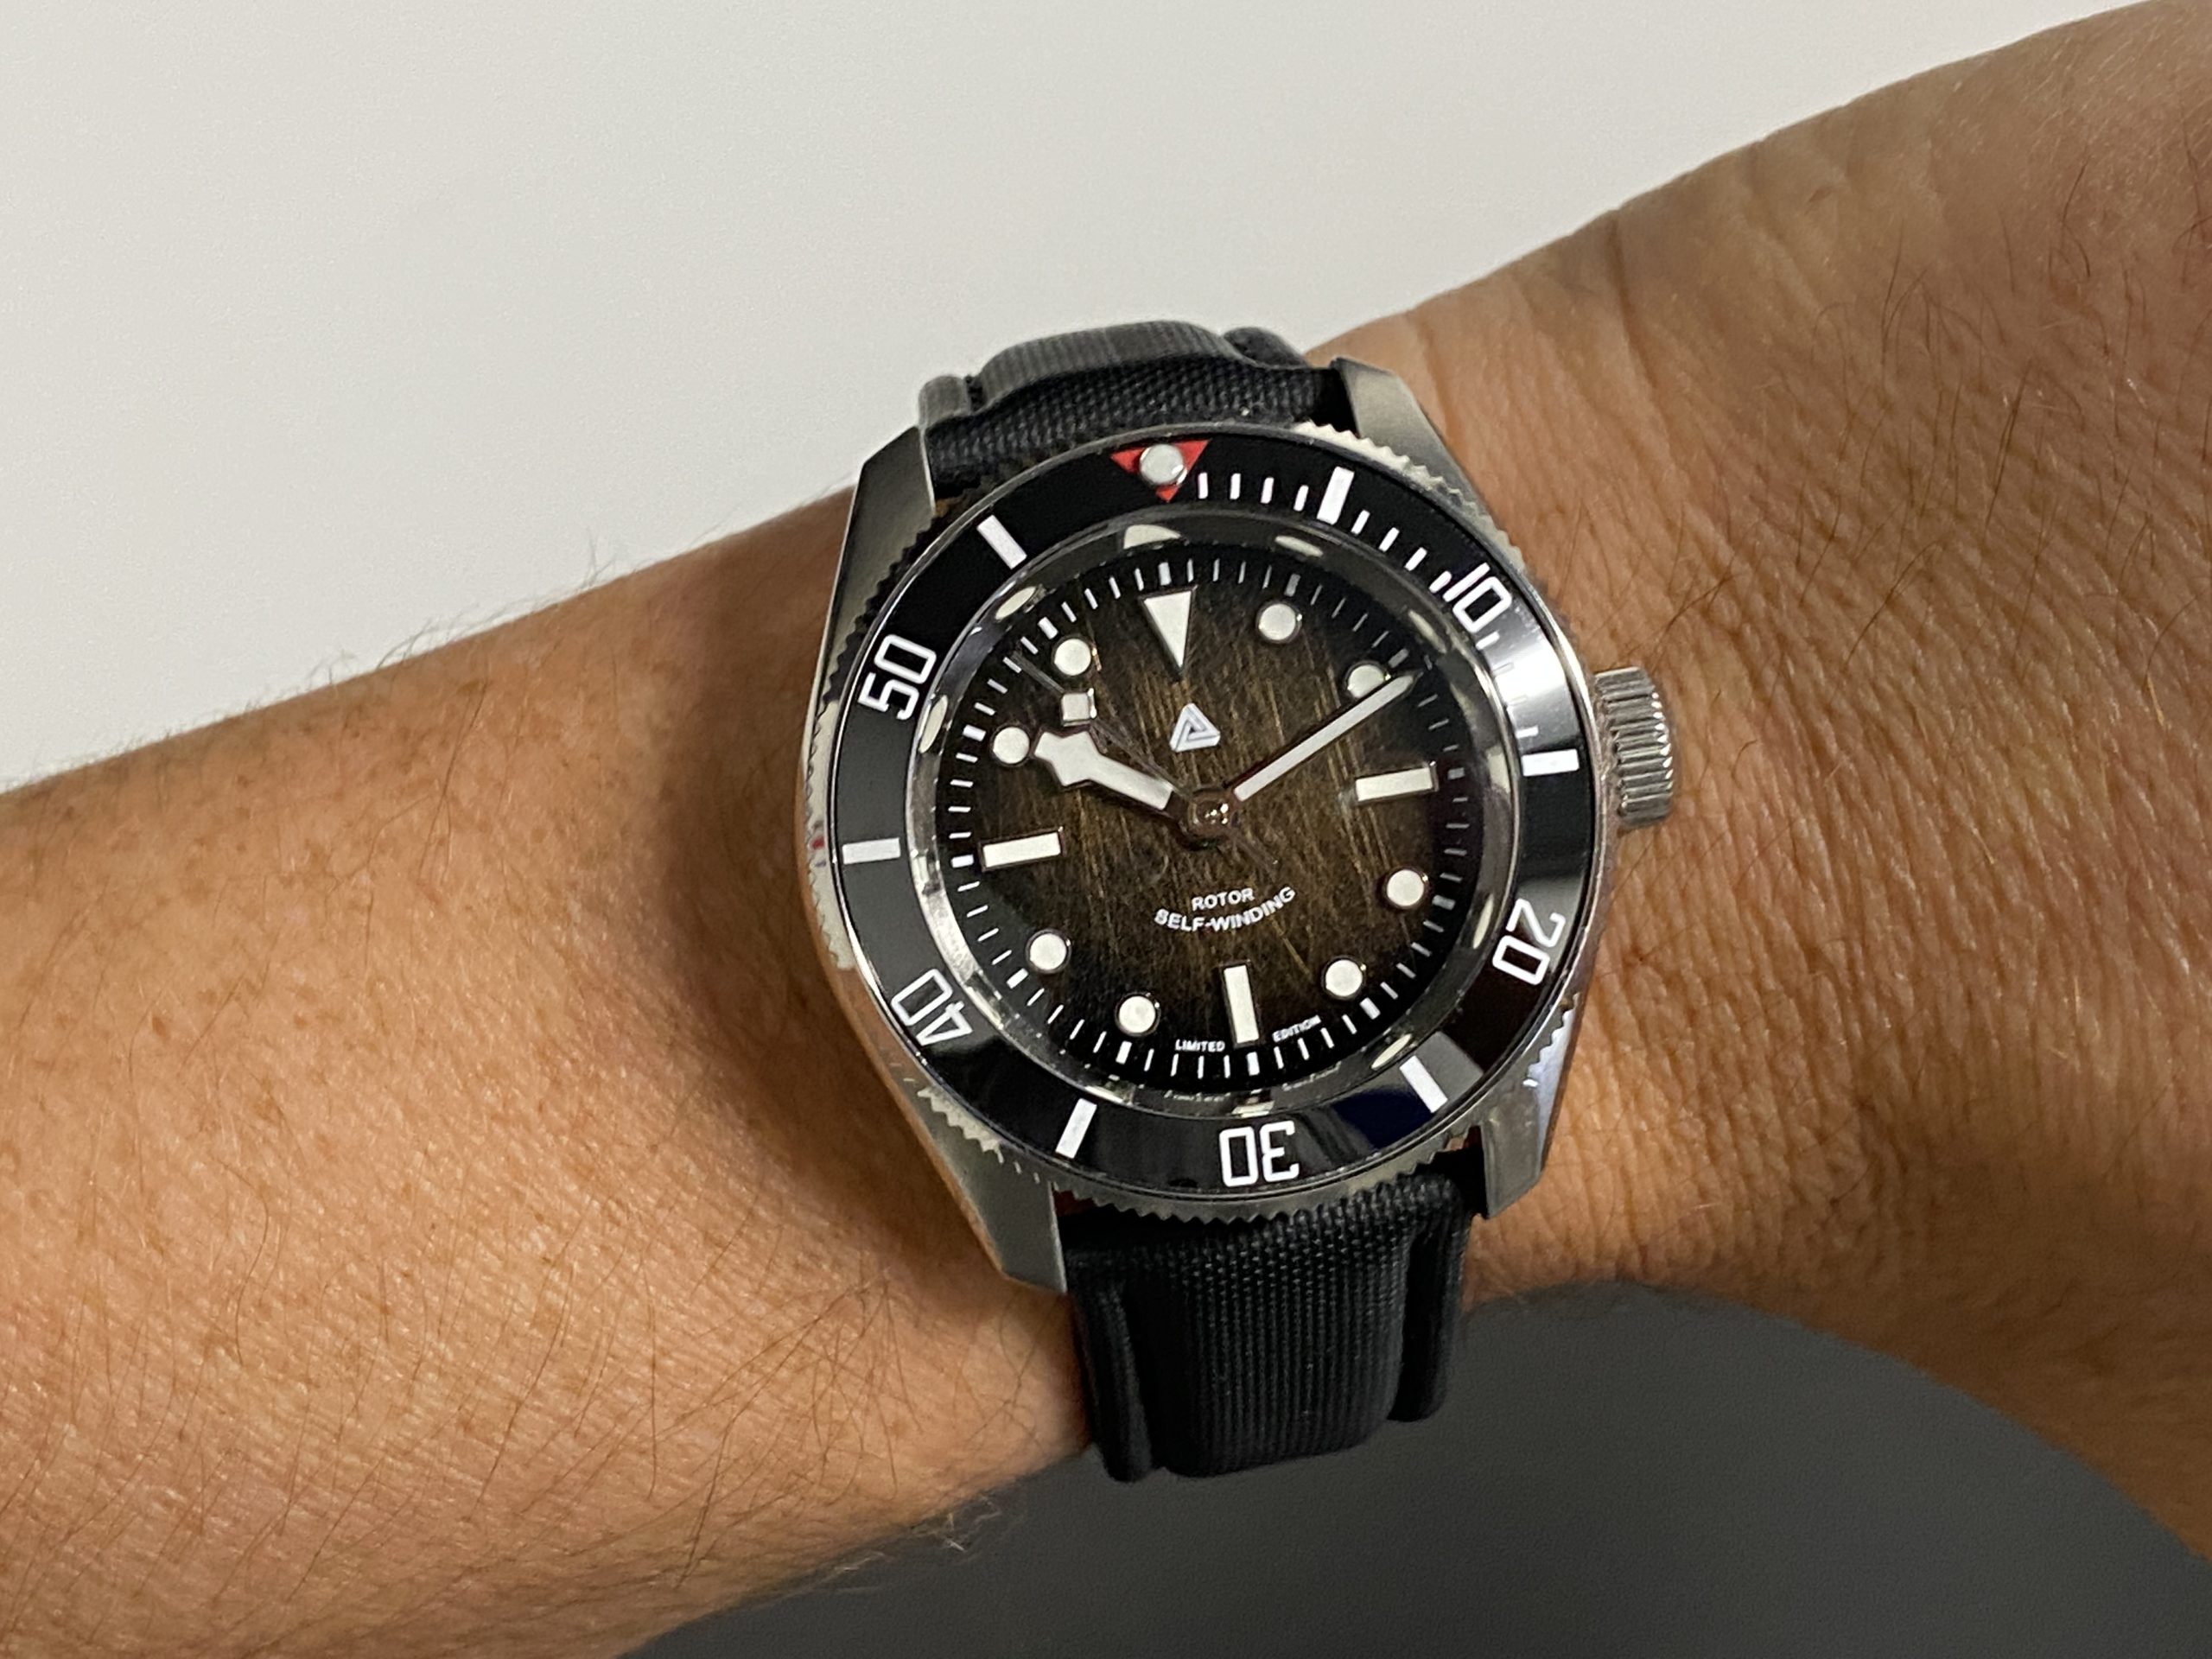
Finally, I applied the bezel insert, making sure the red triangle at 12 o’clock was exactly in the center. This was made simple by the fact that the bezel I bought from Namoki had 3M tape already applied to it. All I had to do was peeling the tape off and sticking it to the bezel. Fairly simple.
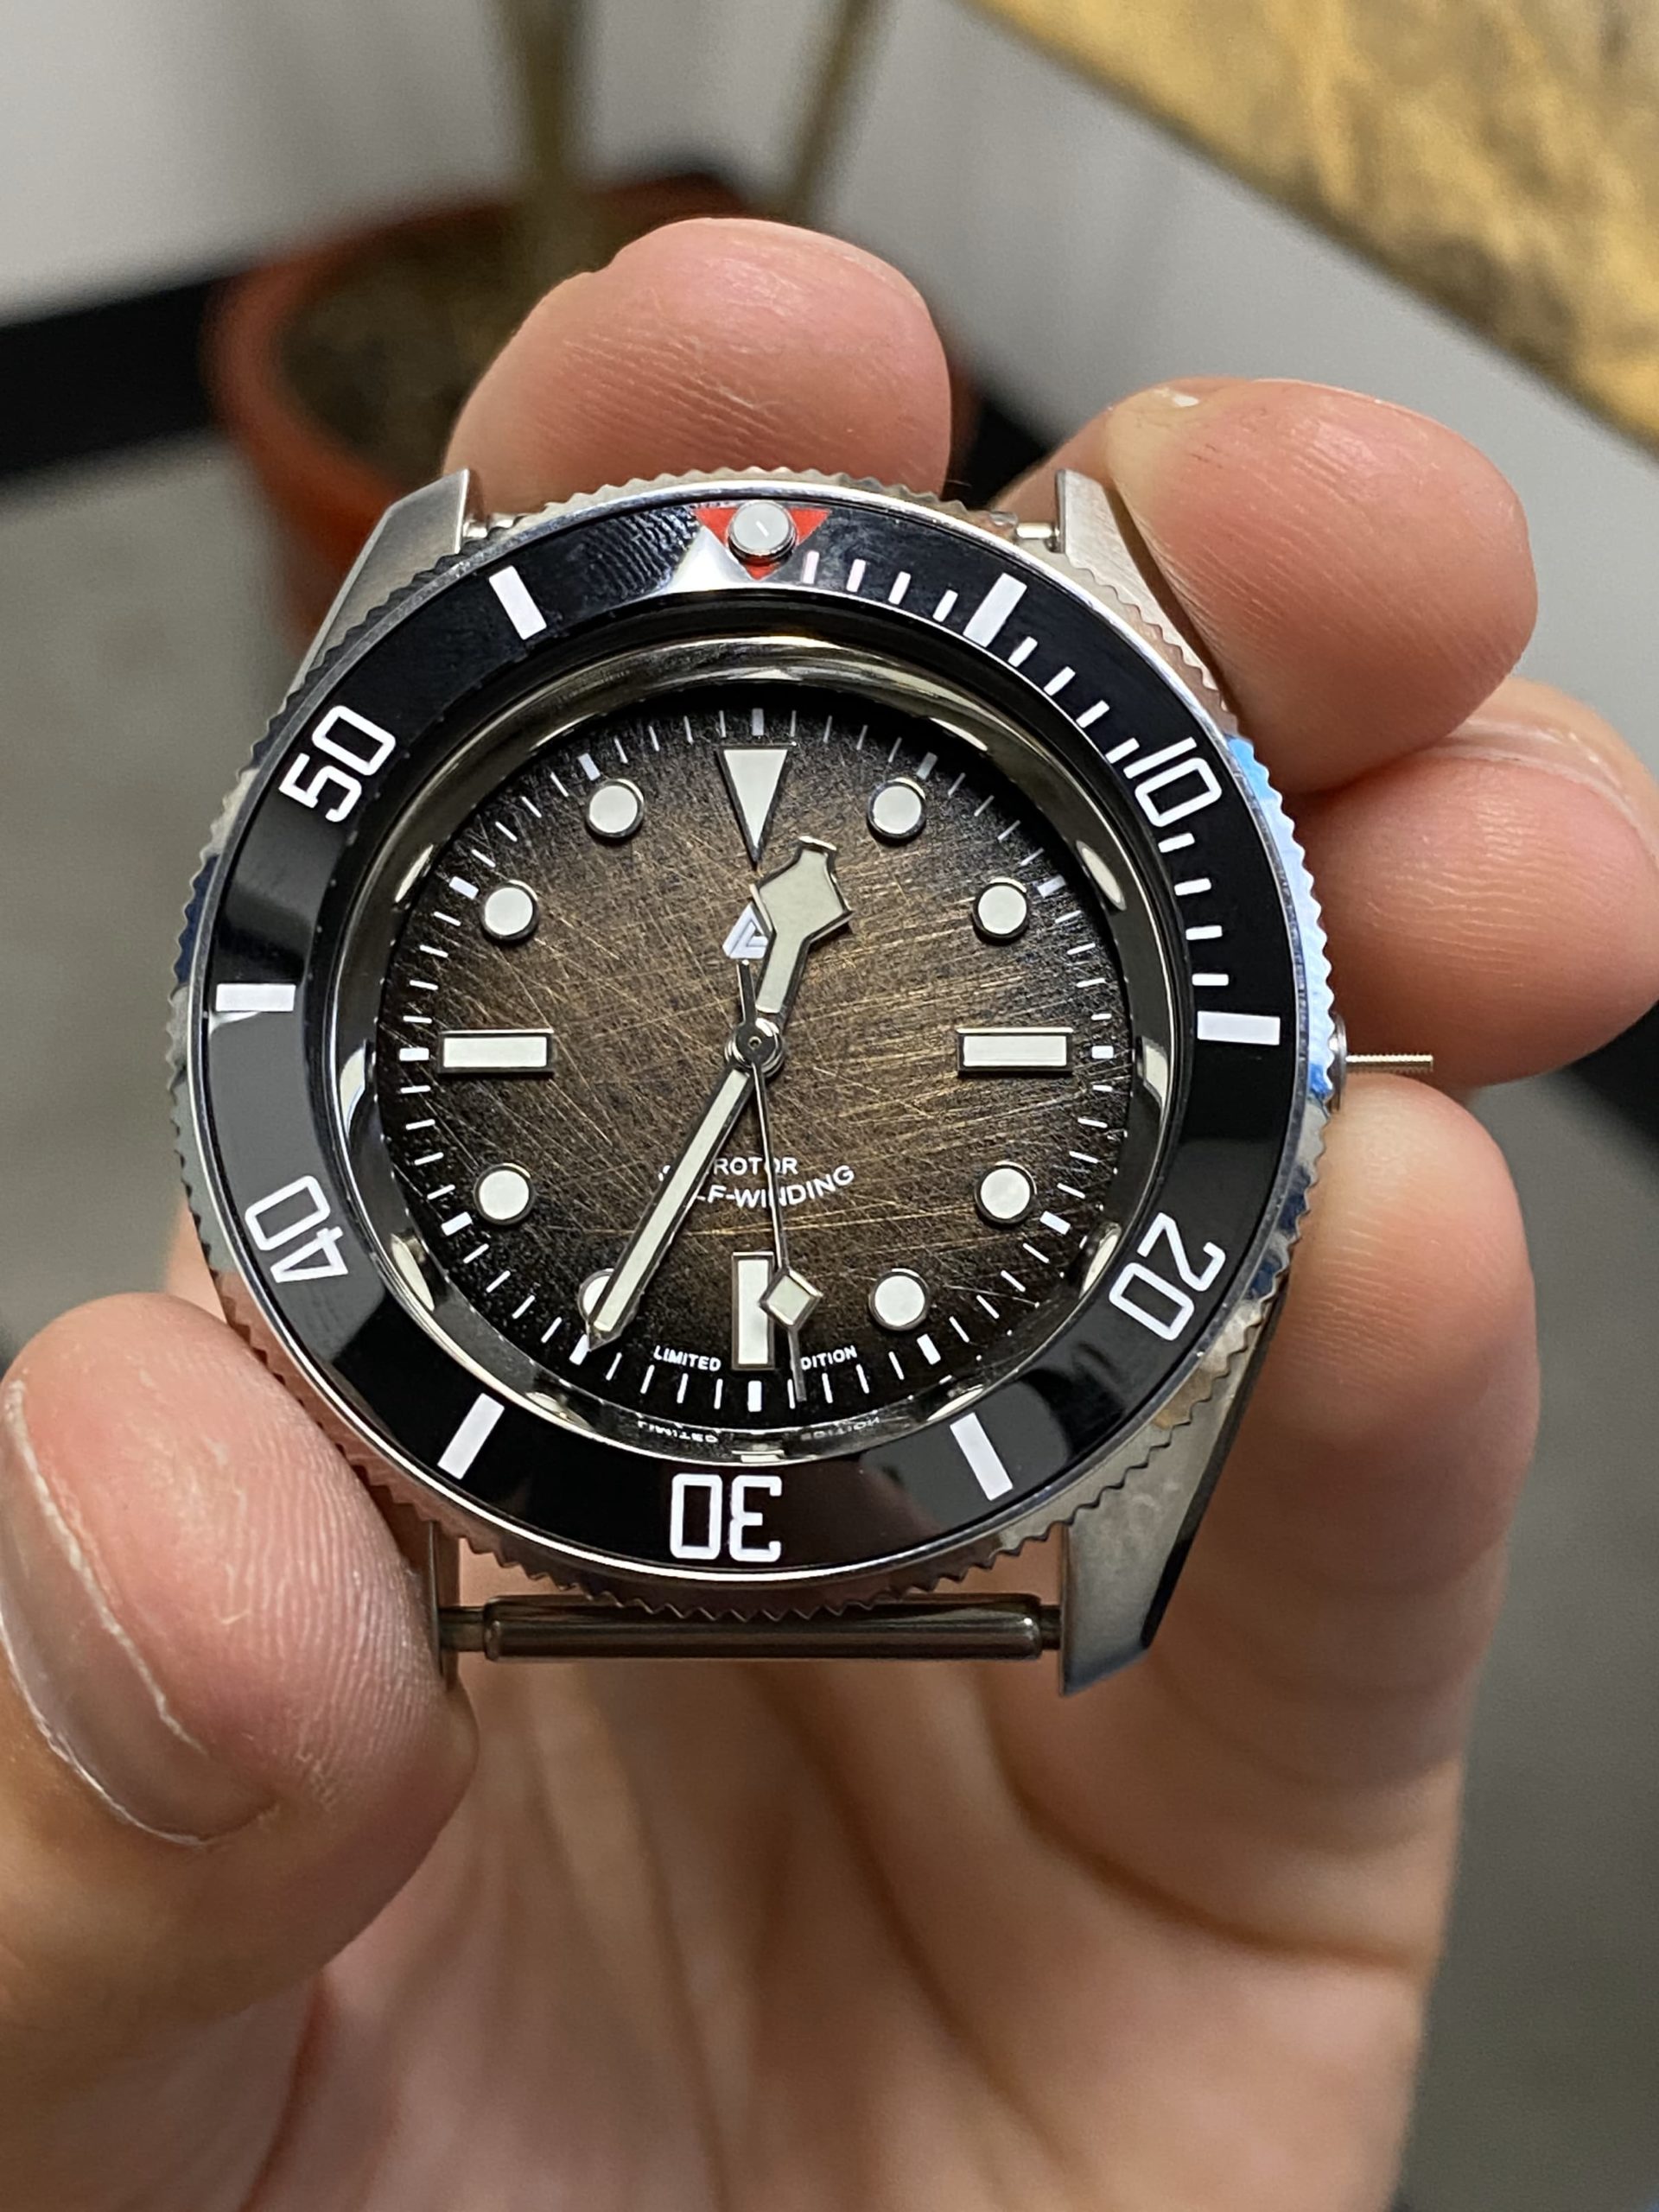
I am not very impressed by the quality of this bezel insert. Not only the red color of the triangle at 12 bleeds to the first couple minute markers, but if you look at the 30-minute marker on the insert, it is not centered properly. And no, this is not because of the angle of the photo. It’s just not made right. I ordered another insert from Namoki which has the exact same issue.
Stem sizing and crown installation
The last step in the watch build was to properly size the stem and of course install the crown. Once again, because I lack the proper tools, it took me a lot of trial and errors to get the size of the stem right.
I probably spent over an hour cutting the stem, filing it, screwing the crown, and checking whether it was the right size. I must have repeated these steps at least two dozen times, but I eventually got it right.
I applied a bit of Loctite 242 threadlocker on the stem and screwed the crown on it. I let it sit for a few minutes and inserted the stem and screwed the crown down onto the case.
Project completed!
A lesson learned
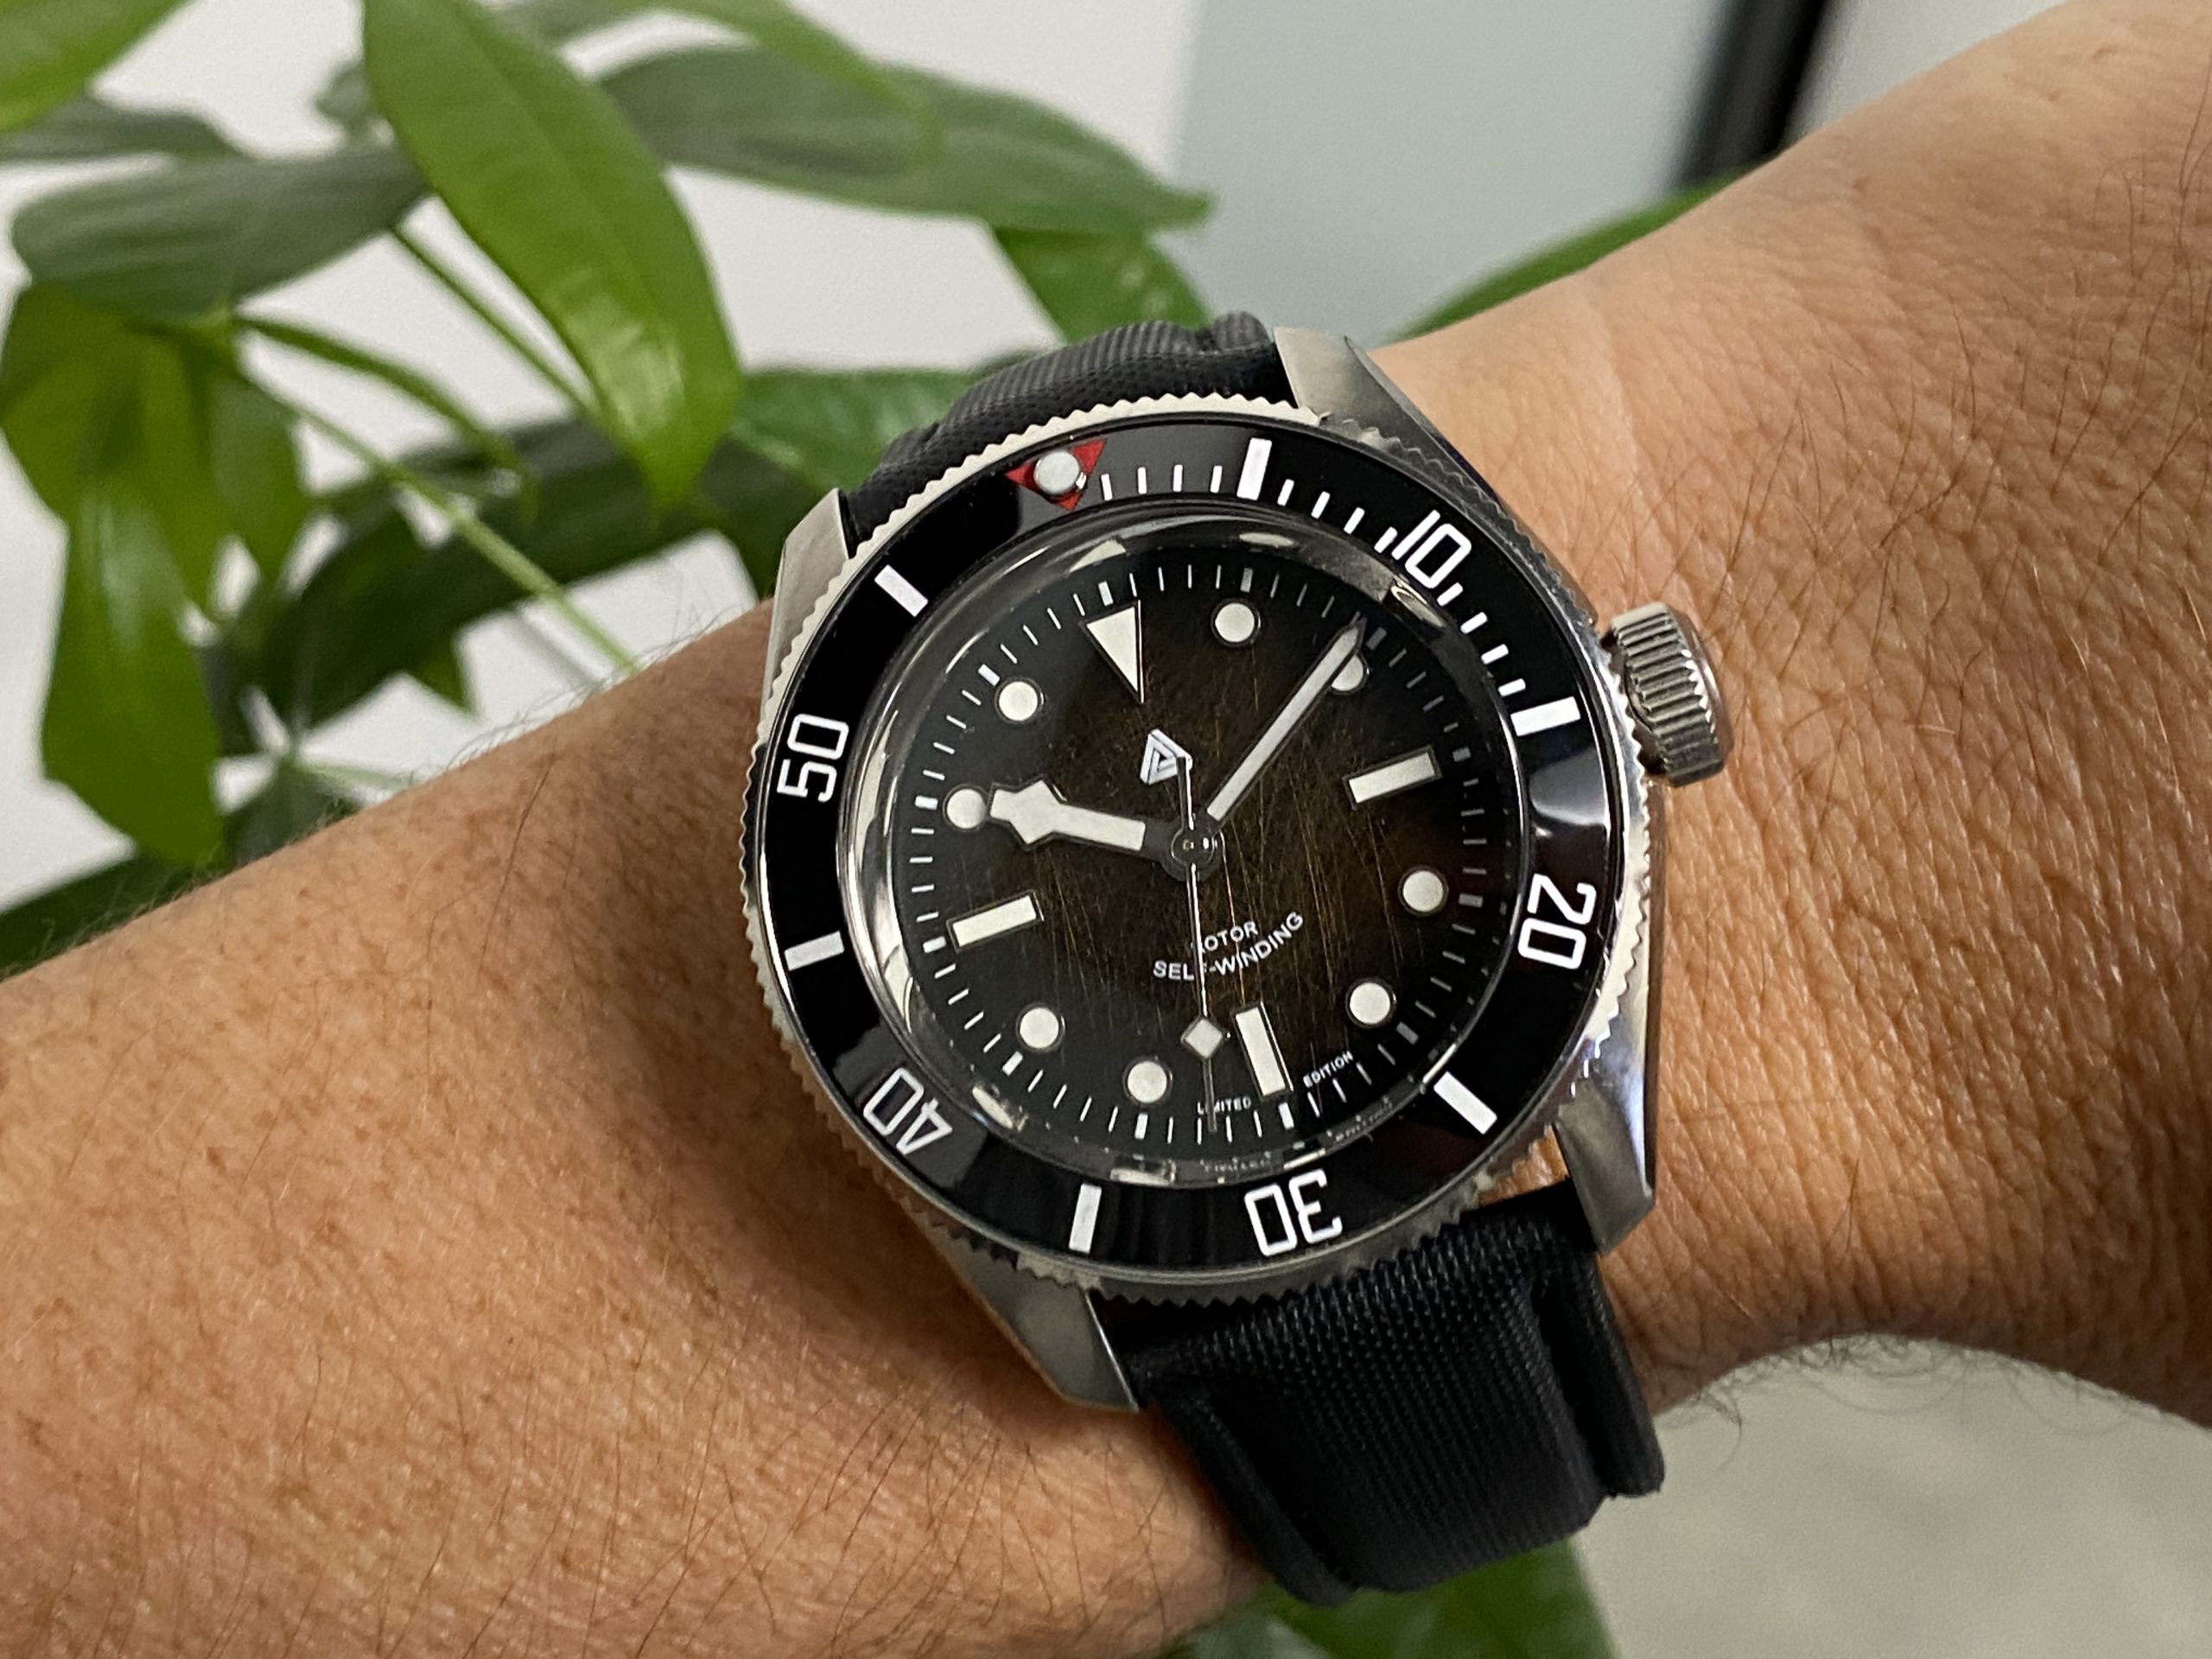
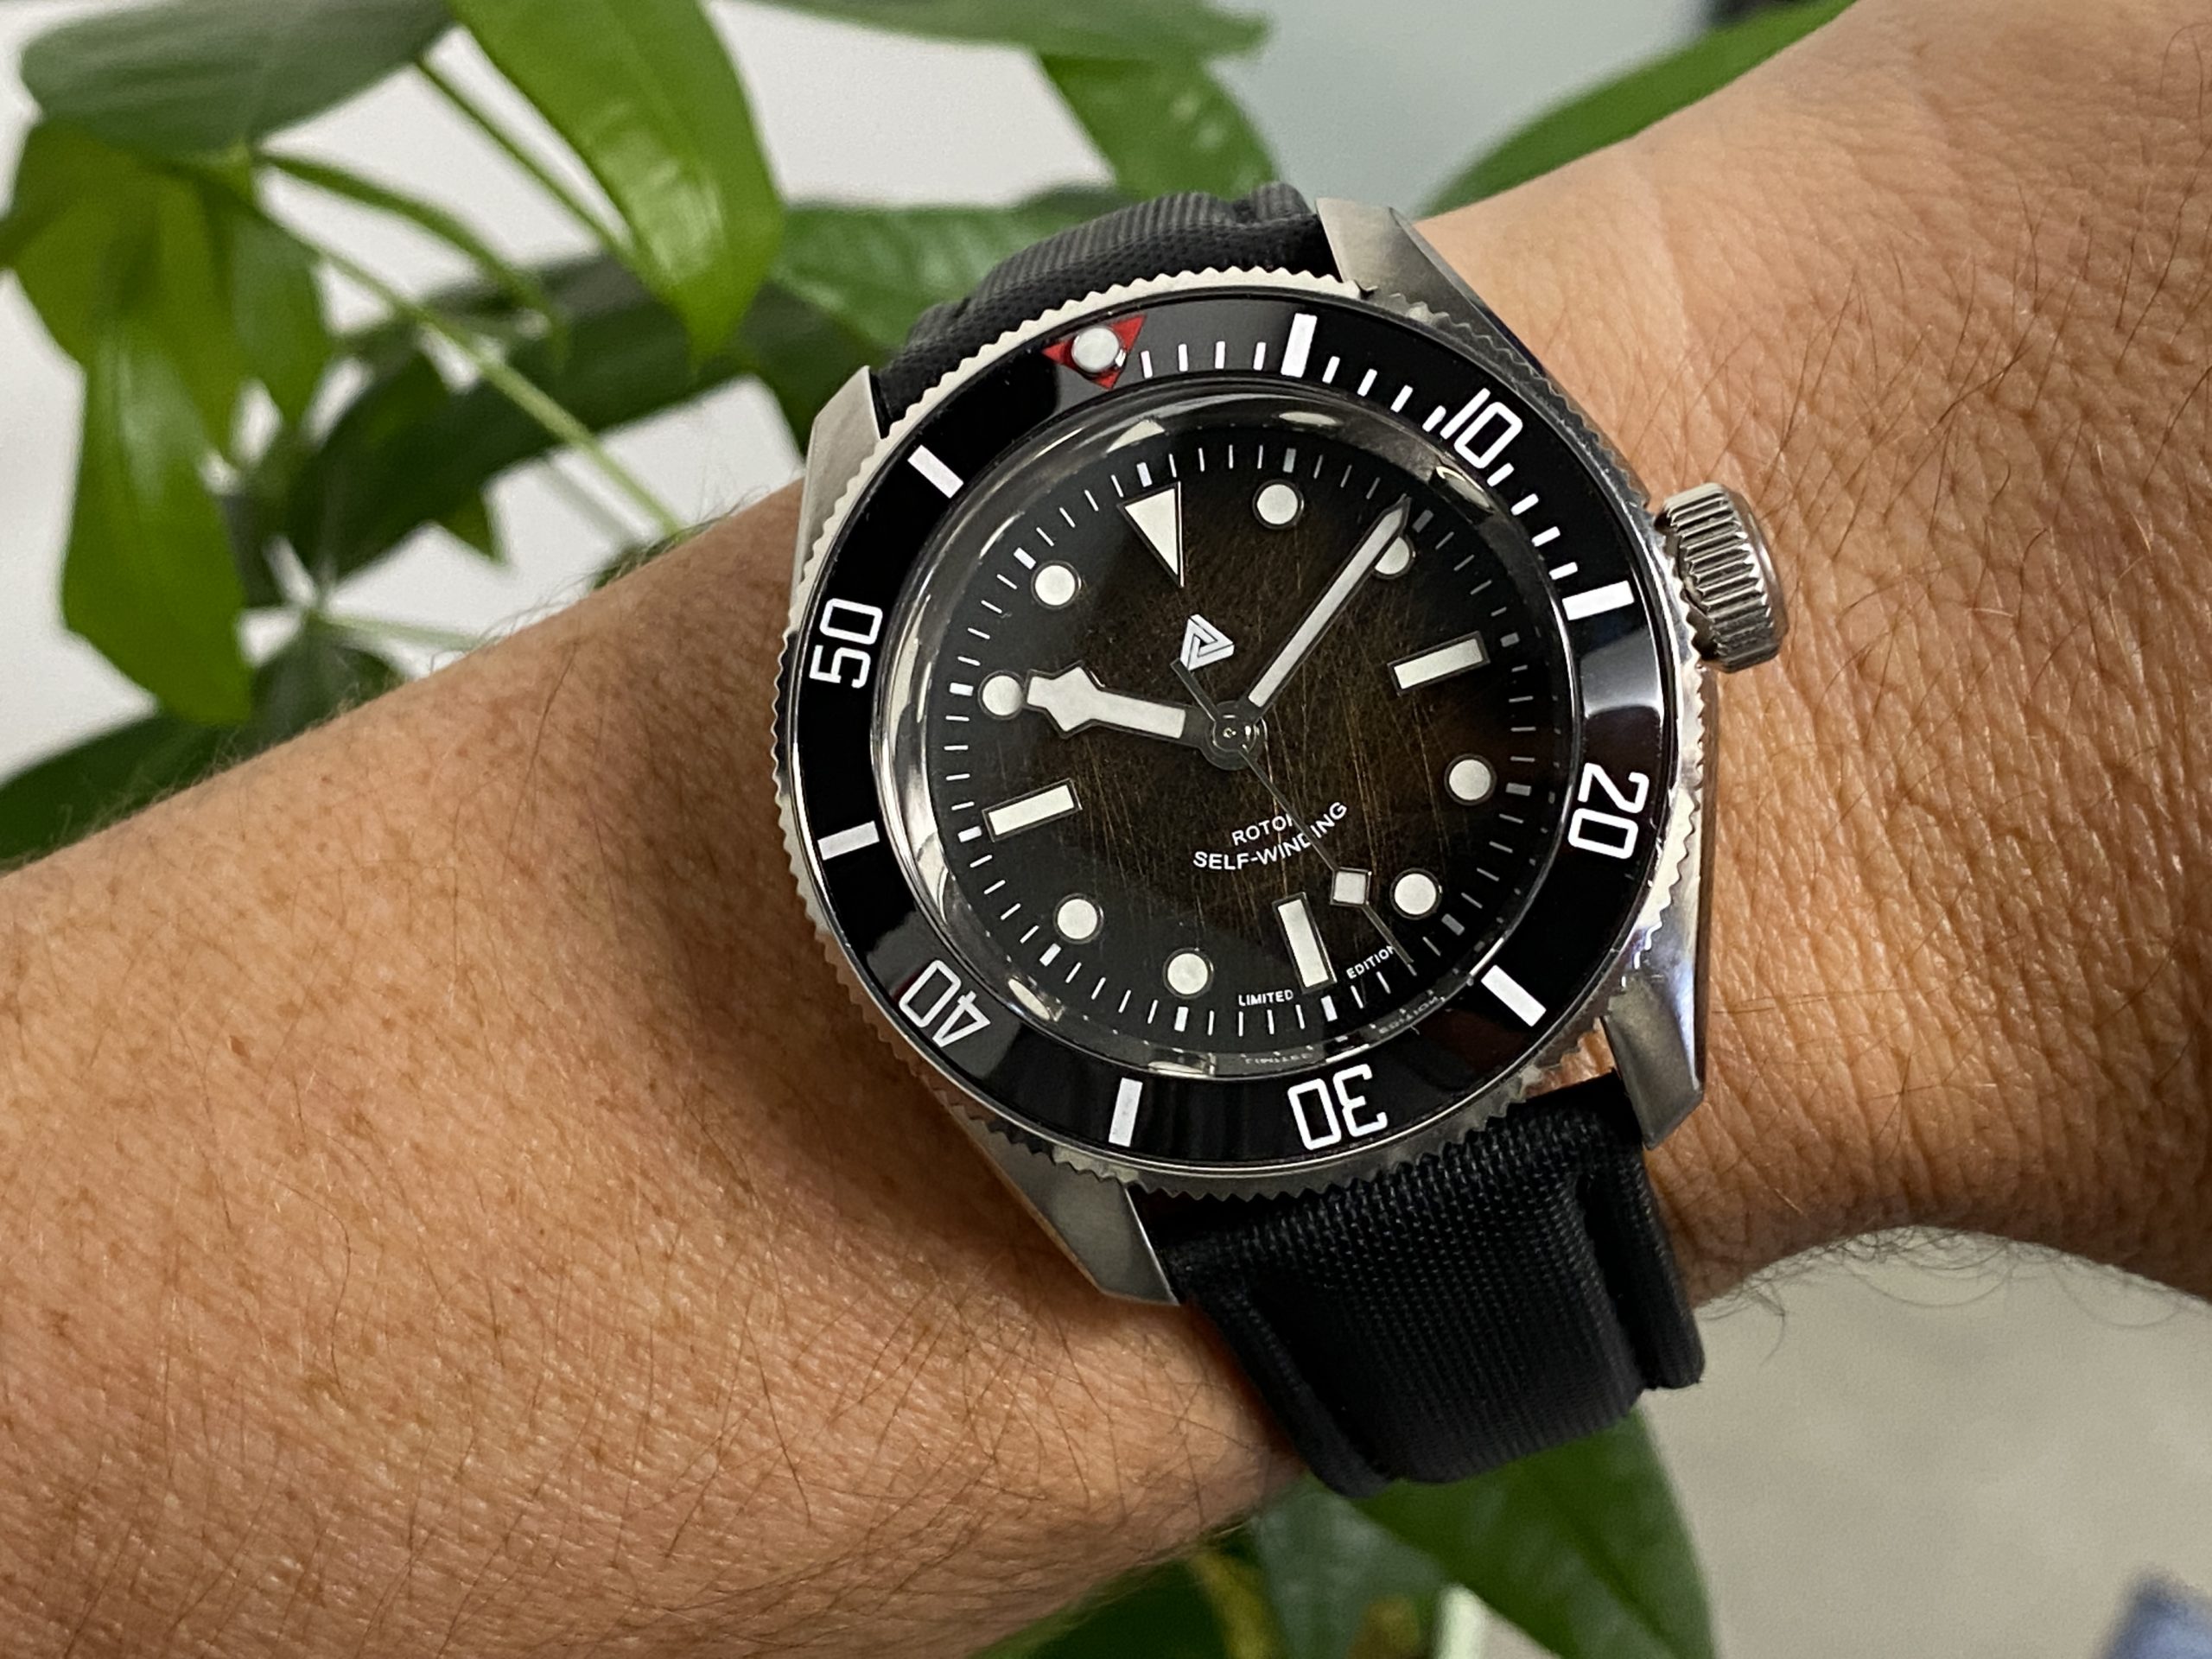
For my first build, I am quite pleased with the result, which I think looks really nice as a whole.
A major downside of my initial build is visible when you look at the dial on the photo below. Can you see it? Look carefully. Most people didn’t notice, but most people aren’t as picky as I am…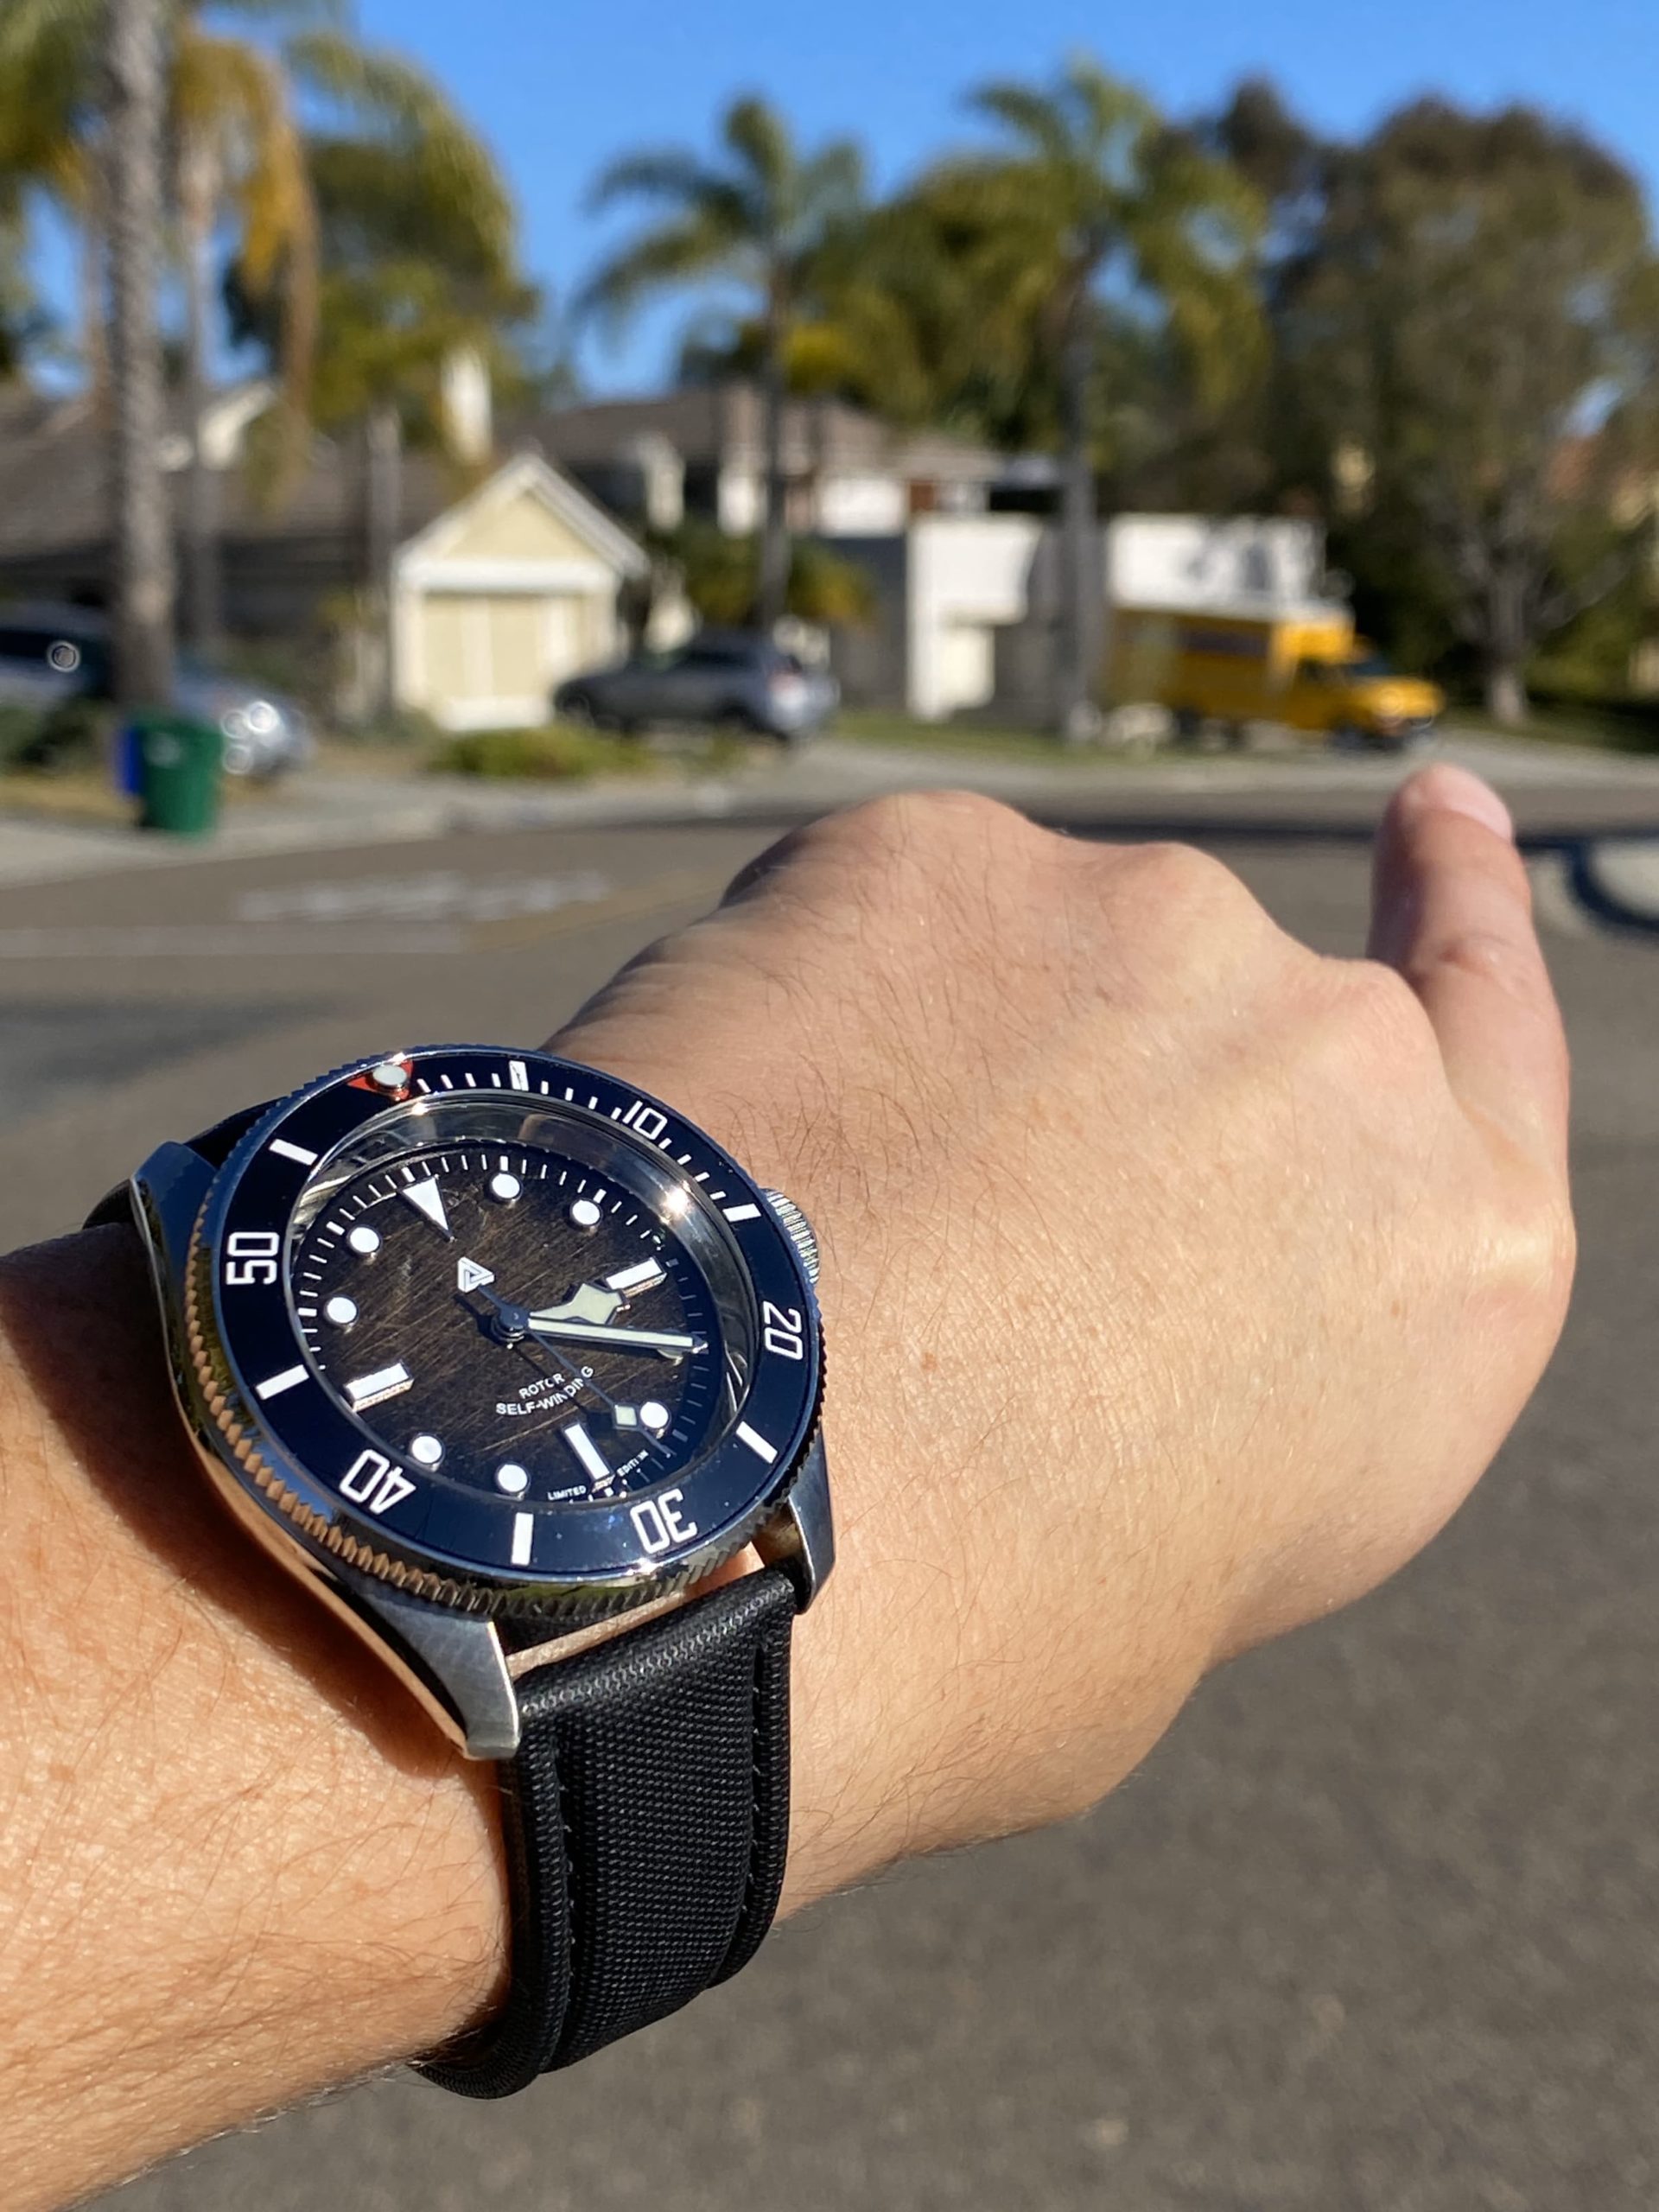
If you look at the color of the hands, you can tell it doesn’t match the color of the hour markers of the dial. That’s because these two parts were sourced from two different suppliers. The mismatch isn’t horrendous, but it’s bugging me enough that I ordered another set of hands from Lucius Atelier, the same supplier as the dial. I would have done so in the first place, but at the time I purchased all the parts, the white snowflake hands were out of stock at Lucius Atelier. And frankly, I didn’t even think for one second there could be a mismatch in the color. That’s definitely a lesson learned here. Update: I have received new hands from Lucious Atelier. The only photo where you can see the old hands is the one above.
The satisfaction of wearing your own creation
After settling for a sailcloth strap for this watch, I have been wearing it almost daily as it has quickly become one of my favorite watches. Of course, it barely stands a candle to my Panerai or my Omega Seamaster, but the satisfaction of wearing something I built from scratch is incredibly exhilarating.
What is also exciting to me is that I can actually tweak this watch should I want to by changing the dial, the bezel insert, or the hands now that I have all the necessary tools.
It turned out to be a pricy little project, but a very exciting and rewarding one. If you’re reading this, I assume making your own watch is something that you have considered, so I really encourage you to do it and not to worry too much about things going wrong, because in the end, it’s a fairly simple process.
If you have any question about anything regarding this build, feel free to hit me up on Twitter @SebastienPage. I’ll be happy to answer any question you may have with my very little knowledge.